PacDude
Version:1.3
Williams 1993
IPD No. 2768
Rules:
Version:1.3
Williams 1993
IPD No. 2768
Rules:
(Edit of Sigma's Guide to Whitewater by Kevin Martin)
Playfield Objects
--------------------------
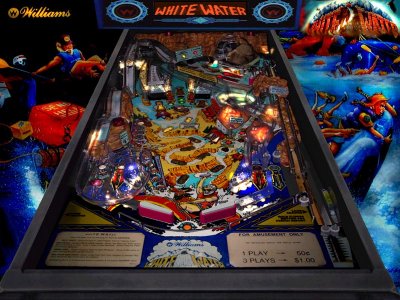
Flippers
There are three flippers - the usual two lower ones, and an upper right flipper on a raised mini-playfield. The right flipper button can be used to control the right flippers independently, with the second stage of button action controlling the upper flipper.
Plunger
This is a normal plunger. It is important that it be in good condition for the two-stage skill shot.
Upper Playfield
This is the raised mini-playfield where Bigfoot resides.
Bigfoot
This is a small furry fellow mounted on the upper playfield. He should spin his head around on various occasions (this feature breaks easily, however), and diverts most balls which go into Bigfoot Bluff into the Whirlpool.
Bigfoot Bluff
This is a Hazard. It is the small upper ramp on the Upper Playfield. It leads to the Whirlpool or Bigfoot's Cave.
Whirlpool
This is a plastic cup (with no scoring sensors) just below the Upper Playfield. Its center hole is ringed by six red lights.
Bigfoot's Cave
This is a simple plastic ramp which feeds to the Right Inlane. It is only reachable during Bigfoot Hotfoot.
Insanity Falls
This is a Hazard. It is the steep lower ramp on the Upper Playfield. It leads to the Left Inlane, after a long, gruesome ramp, which should send the ball into the glass after the third hump. The Insanity Falls is a loop champion shot - the Insanity Record.
Disaster Drop
This is a Hazard. It is the small ramp in the middle of the lower playfield. It loops around underneath the Upper Playfield and drops the ball on the playfield at the entrance to the Boulder Garden Hazard.
No Way Out
This is a Hazard. It is the opening between the two ramps on the lower playfield. It's a lock shot, and ejects balls onto the Upper Playfield, feeding the upper flipper.
Spine Chiller
This is a Hazard. It is the steep left ramp on the lower playfield. It leads to the Upper Playfield, feeding the upper flipper.
Boulder Garden
This is a Hazard. It is the far left loop on the lower playfield. It leads around the back of the machine and to the Jet Bumpers.
Boomerang Bend
This is a Hazard. It is the far right loop on the lower playfield. It leads around the back of the machine and comes out on the entrance to the Boulder Garden Hazard. It is the reverse of the Boulder Garden shot.
Secret Passage
This is a rollover switch leading from just past the entrance to the Boulder Garden Hazard to the entrance lane of the No Way Out Hazard.
Jet Bumpers
These are three jet bumpers in the lower right corner of the lower playfield. They are disguised as large boulders. There are six lights on the playfield in this area, indicating the currently lit and previously awarded Whirlpool Awards.
Extra Ball
This is a narrow plastic target surrounded by two plastic posts. It's almost directly above the Right Inlane, and just below the Jet Bumpers.
Hotfoot
These are two white plastic targets above the right flipper, facing down and to the left.
Light Bounceback
These are three red plastic targets in the center of the lower playfield, facing almost directly left.
Lite Lock
These are two green plastic targets on either side of the No Way Out Hazard.
R-I-V-E-R
These are five blue plastic targets on the left side of the lower playfield, facing right. (On early prototypes, these targets are white.)
Lost Mine
This is a kickout above the Left Inlane. Balls come out of here after landing in the Whirlpool.
River Class
These are six lights in the lower left corner of the playfield, representing your current River Class.
Raft Number
These are nine lights in the middle of the playfield; the flashing one represents your current Raft Number, and previously visited Rafts remain lit until you complete Wet Willie's.
Bounceback
This is a kickback on the Left Outlane.
Outlanes and Inlanes
These four lanes have rollover switches, of which only one can be lit at any time. Change the lit lane by flipping. Either flipper moves the light to the right. The lane lights are white.
Slingshots
There are the usual two above the flippers.
Skill Shot
The Skill Shot is hitting Insanity Falls after gently plunging the ball onto the Upper Playfield. Plunging too softly will leave the ball in the plunger lane. Plunging too hard will send it down the Spine Chiller and screaming towards the flippers. If it doesn't hit a slingshot or roll up into an inlane, you haven't scored any points and can let the ball go. It's best to avoid this situation entirely, however. In fact, on L-4 and later ROMs, the Spine Chiller entrance sensor, tripped in either direction, scores 5K points and eliminates the kindness normally offered for a missed first stage of the Skill Shot.
The Skill Shot is worth 1M the first time, 2M the second, and so on, to a maximum of 5M. You have to watch closely to see the value awarded.
Hazards and Rafts
There are nine possible raft values: 2, 4, 6, 8, 10, 12, 14, 16, and Wet Willie's. You begin the game on Raft #2. You advance to higher rafts by completing lit Hazards. At Raft #2, you must complete one lit Hazard to advance the Raft. At Raft #4, you must complete one or two Hazards - the sequence of number-of-Hazards-needed does not always seem to be consistent. In any case, the number of Hazards needed steadily increases for each raft. Once you have reached and completed Wet Willie's, this sequence starts over, requiring even more Hazards for each advance. All the Hazards you need to advance the Raft are lit at the same time - since there are only seven Hazards, no more than seven are ever required to advance the Raft. On normal settings, the number of Hazards required is typically:
1-2-2-3-3-4-4-5-5
Once you have completed Wet Willie's, you return to Raft #2, and more Hazards (typically an additional two) are needed to advance each Raft.
Advancing the Raft awards 1M times the Raft number you advance to. Both reaching and starting Wet Willie's is considered to be Raft #20 for this purpose (there is no Raft #18, apparently). The Raft number also determines the base Jackpot value for Multiball. The base Jackpot value is 10M plus 1M times the Raft number (and for this purpose, reaching but not starting Wet Willie's is considered to be Raft #18, giving you a base Jackpot value of 28M). For every time you have completed Wet Willie's, the base Jackpot value is an additional 20M,. On L-4 ROMs (possibly others), the maximum base value for the Jackpot is 70M.
Reaching Wet Willie's awards 20M for advancing from Raft #16. However, you don't actually start Wet Willie's until you have completed all of the lit Hazards once more. You know you've reached this stage when Wet Willie's is flashing but not running on the display (see Wet Willie's), or when you hear the quote "Are we there yet?" You may also hear this quote when you start Wet Willie's. Actually starting Wet Willie's, unfortunately, doesn't give any Advance Raft points, although you would expect to receive 20M. (This once screwed me in a Pingolf tournament).
Hitting a lit Hazard is worth the current Hazard Value. This is 500K times the current River Class, to a maximum of 3M. Hitting an unlit Hazard is generally worth 50K (see Miscellaneous Scoring).
You can spot Hazards through Disaster Drops or relighting a lit Bounceback. Doing so behaves as if you had actually hit the Hazard, so that you can collect the Man Overboard value in this fashion (but not Jackpots, Whirlpool Awards, or the Travelling Hazard in Wet Willie's).
The same set of Hazards is lit for each Raft for each player in a multi- player game. That is, if Player 1 has to hit the Spine Chiller and No Way Out to advance to Raft #6, those same Hazards will be lit for Player 2 in the same situation.
Bounceback
The Bounceback is notoriously misbehaved on most Whitewater machines. It's possible for the ball to land and rest on the unfired kicker, and the Ball Search will not fire the Bounceback as part of its search. (However, the fourth Ball Search will kick any locked balls out of No Way Out.)
You can relight the Bounceback by hitting the three red plastic targets facing left in the center of the playfield. Completing these targets while the Bounceback is already lit will spot a Hazard.
The Bounceback is automatically relit at the beginning of regular 3-ball Multiball, but not for other Multiball modes (if it's already lit, this "relighting" does not spot a Hazard).
There is an operator-settable option for the Bounceback to be automatically relit at the beginning of each ball. However, this does not make it easier to spot Hazards by hitting the Lite Bounceback targets. If the Bounceback was not lit at the end of your previous ball and you complete the Lite Bounceback targets on the next ball, you will be awarded Lite Bounceback even though the Bounceback is already lit. Subsequent completions of the targets will behave normally.
Whirlpool Awards
There are six of these awards, and each is represented by a light on the playfield in the Jet Bumper area. The currently lit award is flashing. Previously awarded items remain lit and unavailable until all awards have been completed. The current award is collected by shooting Bigfoot Bluff when lit (that is, when the red light on the sign above it is lit). Light Bigfoot Bluff by shooting Insanity Falls when it is lit (that is, when the yellow light on the sign above it is lit). When the Whirlpool is available (i.e., the yellow or red lights are lit and no Multiball or Whirlpool sequence is underway), every hit on the Jet Bumpers will change the currently lit Whirlpool Award (in sequence). After collecting an award, the next available sequential award is lit. After collecting all six awards, the Whirlpool is reset and Whirlpool Challenge is lit.
Note that hitting Insanity Falls at any time, even if the Whirlpool is unavailable and the yellow light is unlit, will make the Whirlpool available once the current sequence or Multiball has ended, as if you had hit Insanity Falls with the yellow light lit.
In order (from bottom to top), the awards are:
* Whirlpool Challenge (sequence)
* Man Overboard (sequence)
* Light Extra Ball
* Advance Raft
* Mystery Canyon
* 5X Playfield (sequence)
Light Extra Ball is self-explanatory. More than one Extra Ball can be lit at once (one hit on the Extra Ball target is required for each lit Extra Ball). All Extra Balls lit on the target are maintained from ball to ball until collected, except on Hard or Extra Hard settings, in which case all Extra Balls must be collected on the same ball they are lit. You can continue with Whirlpool Awards before collecting the Extra Ball.
Lighting the Extra Ball by any method (Whirlpool Award, Mystery Canyon, or Disaster Drops) earns the quote "Get the extra ball!" from Wet Willie. However, there is a very small chance that he will instead say, "Get the extra ball... YA WIENER!" This never fails to amuse me.
Advance Raft behaves as if you had collected all currently lit Hazards (without awarding the Hazard Value for them). If Bigfoot Bluff is your last Hazard to advance the Raft, and you collect the Advance Raft Whirlpool Award by shooting it, you will advance two Rafts at once. Unlike the Mystery Canyon award of Advance 3 Rafts, the Whirlpool Advance Raft award does award the Raft value.
During all of the Whirlpool Awards which have associated sequences, further Whirlpool Awards are unavailable until the sequence has ended. However, Hazards are lit and can be collected as usual.
When the game begins, Whirlpool Challenge is the current award. When you complete all six awards, Whirlpool Challenge is the current award on the next set, regardless of which award you collected last.
Note that whenever you shoot the lit Whirlpool and the ball is swirling into the Whirlpool, all lights on the playfield cycle in an order corresponding to the six red lights, indicating the swirling of the Whirlpool.
Whirlpool Challenge
This is a two-ball multiball. The object of this mode is to "fill the Whirlpool" with balls. Shoot the Whirlpool by shooting Bigfoot Bluff; Bigfoot will divert the ball. Initially, the Whirlpool is lit for 5M; this increases by 2M for every time you hit it. The exceptions are every sixth hit, when you "complete" the Whirlpool (this is why there are six lights around the exit from the Whirlpool). Completing the Whirlpool is worth 20M the first time, and an additional 20M each subsequent time (that is, 20M, 40M, 60M, 80M, with a final limit of 100M). The Whirlpool Completed value replaces the currently indicated value, yet the value still increases as it would have. I believe the limit to the normal Whirlpool Value is 53M or so (this value repeats).
If you lose one ball without collecting any Whirlpool values, the Whirlpool remains lit for quite a while for a Last Chance at 5M. There is no grace period otherwise. On easy settings, this Last Chance is offered regardless of the current Whirlpool value.
If you put the second ball into play and lose it before the locked ball kicks out of the Lost Mine, you will usually get it back, even though you scored points by tripping a few sensors. You can, in fact, get unlimited free R-I-V-E-R letters using this trick - simply plunge the ball gently, let it roll over the lit right inlane and drain. You'll always get the ball back. (This also applies to the Gold Rush and Multiball Restart.) This is not true with L-4 or newer ROMs, however; hitting any switch will immediately kick the other ball into play.
Starting Whirlpool Challenge is actually dependent on the ball reaching the Lost Mine sensor. If the ball does not do so (usually because the switch in the Whirlpool is flaky and closing when no ball is present), Whirlpool Challenge becomes solidly lit but does not start until the next time a ball is seen in the Lost Mine. This means you can start more than one round at a time under certain conditions!
Man Overboard
"Head for the blinking lights!"
(or)
"Head for the blinking light!" (if only one Hazard is currently lit)
This Whirlpool Award makes all currently lit Hazards worth 20M, counting down to 3M. Hitting any of these lit Hazards rescues the Man Overboard and awards the current value. There is a grace period at 3M. Letting this grace period expire or side draining the ball at any point during the sequence earns the quote "Dang, lost another one!"
The 20M initial value is adjustable by the operator.
Note that a side drain earns the quote but does not end the Man Overboard sequence. If you manage a Death Save, the timer will resume and you can still collect the Man Overboard value. You can also hear the side drain quote twice in one ball. Naughty, naughty.
Mystery Canyon
This is a random award, from the "Spirit of the River". Possible awards are:
* 5M
* 6M
* 8M
* Extra Ball Lit
* Special
* Advance to River Class 6
* Advance 3 Rafts
If you have fewer than 3 Rafts remaining before reaching Wet Willie's, the last award is downgraded appropriately. In Tournament Mode, Mystery Canyon always awards 5M.
The Spirit will not award River Class 6 if you are already at River Class 6. However, it may award River Class 6 if you have already reached it on a previous ball - the Spirit is not concerned about your progress towards the Vacation Bonus.
The Advance Rafts award does not award any of the Raft values.
5X Playfield
5X Playfield makes almost all playfield values worth five times as much for a period of twenty-five seconds. There is a slight exception for Multiball Jackpots. On L-3 ROMs (possibly others), this multiplier does not apply to the Vacation Bonus. Combo Shot awards are also not displayed as multiplied, although on L-4 ROMs (possibly others), the multiplied values are awarded. All other values are multiplied by five during this time. Most values which are multiplied are displayed as the multiplied value (with the exception of Boulder Bash). There is no grace period on the 5X Playfield timer - in fact, it ends immediately after it counts to 1 second, rather than to 0 seconds. During Wet Willie's and Bigfoot Hotfoot, the 5X timer is not displayed. During Multiball (including the intro), it is rarely seen but remains active.
Hitting Bigfoot Bluff to award 5X Playfield will immediately multiply the Camera Craze or Hazard Value awarded for Bigfoot Bluff itself, but not the Raft value (if awarded).
Spine Chiller
The only special feature of the Spine Chiller is Multi-Millions. Rolling through the Right Inlane lights Multi-Millions, which is 2M, collected on the Spine Chiller. Rolling through the Right Inlane immediately again after collecting Multi-Millions will light Multi-Millions for 3M. This sequence reaches its maximum at 5M. A relatively slow shot which is nevertheless successful will usually not award Multi-Millions, nor will it qualify as part of a Combo Shot.
During Multiball modes, if there is ball being kicked out of No Way Out when you hit the entrance sensor for the Spine Chiller, the game will logically connect this with the other ball rolling over the Upper Playfield sensor, and will award you the Spine Chiller if it is a lit Hazard. This can be a useful trick.
Note that the Spine Chiller is the only way other than No Way Out (or the plunger, of course) to get a ball to the upper playfield. It is the more difficult of the two shots.
If you hit the Spine Chiller and let the ball go through the Right Inlane immediately afterwards to light Multi-Millions, the first Multi-Millions will be worth 3M, rather than 2M.
Boulder Garden
The current value of the Jet Bumpers is determined by the Boulder Garden Hazard. Initially, the Jet Bumpers are worth 50K per hit. For every time you hit the Boulder Garden Hazard over the course of a game, this value increases by 50K, to a maximum of 300K. Every three times you hit the Boulder Garden Hazard, a Boulder Bash begins. This is a twenty second sequence during which Jet Bumpers are worth 500K per hit. The sound effects for this run continuously, rather than in sync with actual Jet Bumper hits. Presumably, the Jet Bumpers award their regular value along with the Boulder Bash value. 5X Playfield does apply to the Boulder value and the Boulder Bash. This once allowed me to obtain an 83M Boulder Bash with little effort.
Disaster Drop
The number of times you hit the Disaster Drop Hazard is counted, and certain awards occur at certain intervals. The sequence is:
* Spot Hazard at 3
* Hold Bonus at 6
* Advance Raft at 9
* Spot Hazard at every 3 for a while thereafter
Extra Ball Lit is somewhere between 3 and 15 - this is a self-adjusting value. Unfortunately, the Status Report only indicates when the Extra Ball will be lit, and hitting the Disaster Drop only indicates when the next award comes. As a result, there is often some uncertainty about what will next be awarded by the Disaster Drop. There is a second Extra Ball Lit at 60 Disaster Drops; this appears to be a fixed value. On hard settings, there is no second Extra Ball from Disaster Drop.
When the Extra Ball Lit award falls on a multiple of 3, it appears that the regular award at that value is overridden. This is most unfortunate.
Past a certain number of Disaster Drops, the Spot Hazard award becomes less frequent, eventually coming at multiples of 10 Drops, with the last Spot Hazard being awarded at 100 Drops, with another promised at 255 Drops! If you actually reach 255 Drops, the game stops counting, and every subsequent Drop spots a Hazard.
Note that Hold Bonus does absolutely nothing on any Whitewater machine I have seen or heard of. The Bonus is computed from factors which are already maintained from ball to ball, and the River Class is never held from one ball to the next, even with Hold Bonus. Also, having Bonus Held on the last ball of a game does not award the bonus twice.
See also End-of-Ball Bonus.
Secret Passage
"You found the Secret Passage!"
Rolling over this switch immediately advances the Raft value. A ball which wanders up into the Secret Passage and back down through it as well will advance two Rafts. This is true at all times, including Multiball. If Wet Willie's is running, advancing the Raft by this method yields the appropriate sound effect and quote but has no other useful effect.
The Secret Passage will also collect the Man Overboard value when that sequence is running. However, some people have told me otherwise. This very likely depends on your ROMs.
Combo Shots
The Two Way Combo is Spine Chiller to Insanity Falls, worth 2M.
There are several possible Three Way Combos, each worth 5M. One is Spine Chiller to Insanity Falls to No Way Out. Another is Spine Chiller to Insanity Falls to Disaster Drop. Spine Chiller to Insanity Falls to Boomerang Bend also qualifies.
On newer machines, there is a Four Way Combo for 8M. It is Spine Chiller to Insanity Falls to No Way Out to Insanity Falls. On older machines, the Four Way Combo awards 10M.
On newer machines, there is a Five Way Combo for 10M. It is the Four Way Combo followed by Disaster Drop or Boomerang Bend. Note that all of these Combos are built upon simpler Combos, so the values add up to more than it seems. The Five Way Combo is effectively worth at least 25M.
Note that Combos can only be obtained by hitting the actual targets in the appropriate order, with little delays and no intervening targets (except the Left Inlane switch and possibly the Lite Lock targets). You cannot get Combos by spotting Hazards. You also cannot get Combos during Multiball.
All Combos begin with the Spine Chiller.
River Class
The River Class acts as a Bonus Multiplier and the multiplier for the Hazard Value. You must also advance to a Class Six River in order to collect the Vacation Bonus. You can spot letters in R-I-V-E-R in two ways. Hitting the plastic targets on the left side of the playfield will spot any unlit letter which is hit. Rolling through any lit Inlane will also spot the first unlit letter in the word. Completing R-I-V-E-R advances the River Class. There is apparently no way to maintain your River Class from one ball to the next (Hold Bonus has no effect). However, the R-I-V-E-R letters are maintained from one ball to the next, strangely enough.
Remember, the light on the Inlanes and Outlanes is steerable with the flippers. Either flipper moves the light to the right. Flipping both flippers simultaneously moves the light twice (ie, there's no exclusion on the flipping). The Left Outlane is lit at the beginning of each ball. Outlanes are worth 250K when lit, and do not spot R-I-V-E-R letters.
The Hazard Value is 500K times the current River Class.
Wet Willie's
Once you have advanced the Raft while on Raft #16, you must complete all Hazards one more time in order to reach Wet Willie's. Effectively, you are advancing from Raft #18 to Raft #20 - it isn't clear why there is no Raft #18 light on the playfield. You can more easily reach Wet Willie's by using one of the several shortcuts to advance the Raft to #20.
When you reach Wet Willie's, he will appear on the display and call out, "Welcome to Wet Willie's!" You will then be in Stage 1 of Wet Willie's. At this point, all Hazards are lit and worth 10M when collected. Once you have collected all seven Hazards, Stage 2 of Wet Willie's begins. In Stage 2, a single Travelling Hazard is lit, moving from Hazard to Hazard. Each Hazard remains lit for approximately three seconds before the next Hazard becomes lit instead. The sequence of lit Hazards repeats. If you do not collect the lit Hazard within 25 seconds, Wet Willie's ends and you are returned to Raft #2.
Collecting the Travelling Hazard is worth a cool 100M (or 50M on very early ROMs). The Hazards are lit in the following order: Disaster Drop, No Way Out, Spine Chiller, Boulder Garden, Insanity Falls, Bigfoot Bluff, and Boomerang Bend. 25 seconds is not long enough to go through this sequence twice - Stage 2 expires after the Travelling Hazard reaches No Way Out for the second time.
Stage 1 is maintained between balls - if you drain, your next ball will resume the sequence where you left off. However, draining during Stage 2 will end Wet Willie's and return you to Raft #2.
There is no Stage 3.
Note that if you lock a ball during Stage 2 of Wet Willie's, the hazard will continue to travel and the timer will continue to count down! It is usually wise to avoid locking a ball during Stage 2.
Wet Willie's is considered a "mode" for some purposes - you cannot start the Gold Rush or spot items, and you cannot collect Whirlpool Awards. However, you can light Locks and start Multiball; Wet Willie's and Multiball are not at all mutually exclusive. You can start Multiball while in Wet Willie's (preferably Stage 1), and you can reach and start Wet Willie's while in Multiball.
There shouldn't be any grace periods on Stage 2 of Wet Willie's, but there is one (perhaps unintentional) one. If you shoot No Way Out while Disaster Drop is lit for 100M, the machine will pause. During that pause, the Hazard travels to No Way Out and awards the 100M!
Bigfoot Hotfoot
Completing the two Hotfoot targets enough times (normally 3 or 4, but it may be as high as 14 or as low as 2, depending on settings and reflexing) will start a Bigfoot Hotfoot. This sequence lasts 20 seconds and uses only the ball currently in play. During this time, Bigfoot is distracted and you can sneak into his cave. Bigfoot Bluff awards the Bigfoot Jackpot, and Bigfoot will not divert the ball into the Whirlpool. Instead, the ball will quickly be fed to the Right Inlane, from where you can shoot the ball to the upper playfield for another Bigfoot Jackpot.
The Bigfoot Jackpot awards 10M, and spots items for the Lost Mine. If all three items for the Lost Mine have already been collected (either via the Lost Mine or Bigfoot Hotfoot), the next items are a Camera and a Cow. Further Bigfoot Jackpots award only the 10M. Completing a Gold Rush resets your items.
The sequence actually lasts for 20 seconds, but by the time the opening animation has completed and you realise that Hotfoot is underway, there's usually only 16 seconds left on the timer. The timer does pause for the kickout from No Way Out. You can get six or seven Bigfoot Jackpots during a single Hotfoot if you're consistent and careful.
Because the Hotfoot timer pauses, the 5X Playfield timer will also pause along with it if you have both running at once. This makes it very easy to get 50M for each Bigfoot Jackpot. This is probably a limitation of the software.
"Hey, a flashlight!"
"Hey, a map!"
"Hey, a key!"
"Hey, a camera!"
"Hey, a... COW?!"
Camera Craze
Once you have collected the Camera from the Bigfoot Hotfoot sequence, a Camera Craze is active. For the rest of the ball, all Hazards except No Way Out are worth 3M and a quick Polaroid of Bigfoot in some goofy pose. No Way Out is most likely excluded from this mode because it's too easy to shoot it repeatedly.
There is a distinctive sound effect for Camera Craze. You are awarded the 3M Camera Craze even for Multiball Jackpot shots. Note also that the value becomes 15M during 5X Playfield.
Lost Mine
Hitting the ball into the Lost Mine, except during Multiball modes and Whirlpool Award sequences, spots items needed for the Gold Rush. Once all three items (flashlight, map, and key) have been collected, either via the Lost Mine or the Bigfoot Hotfoot, hitting the Lost Mine (except during Multiball modes and Whirlpool Award sequences) starts the Gold Rush. This is a two-ball multiball, during which all switches immediately award 250K. Hazards can be collected as normally. The Gold Rush ends when one or both balls drain.
The Gold Rush can be used to get free R-I-V-E-R letters using the same trick that is described under Whirlpool Challenge (except on L-4 or newer ROMs).
Multiball
You must lock all three balls at No Way Out in order to start three-ball Multiball. Under most difficulty settings, lighting the Locks the first time in a game will only require hitting each green target ("Lite" and "Lock") once. The second time will require hitting each target twice. The third and later locks require hitting each target only two times, but a flashing target will time out if you do not complete the other target within a few seconds.
Specifically, the first locks go unlit to lit. The second go unlit to flashing to lit. The third go unlit to lit to flashing, but if only one is flashing, it will time out. The meaning of a flashing light is unfortunately inconsistent for different Multiballs.
Locking a third ball at No Way Out is the only way to start three-ball multiball. During Multiball, Insanity Falls is lit for the Whitewater Jackpot, which has a base value of 10M plus 1M times the current Raft number. More accurately, the base value is 10M, increased by 2M for every time you have advanced the Raft. If you have completed Wet Willie's and advanced again to Raft #6, for example, your base value is 36M.
All three balls are fed to the upper right flipper. How many of these balls successfully go through Insanity Falls determines whether you will be collecting Single, Double, or Triple Jackpots for the rest of that Multiball.
- ROM------------------>