- Joined
- Oct 3, 2004
- Messages
- 1,593
- Solutions
- 2
- Reaction score
- 1,236
- Points
- 132
- Favorite Pinball Machine
- Trigon
This is not a wip, just a experiment. During the last couple weeks, I counted about 9 bugs in VP even I don't remember hearing about, one being that VP (from what can be figured out) will save a table with a bad or incorrect checksum under certain conditions. This renders the file inoperable, which is exactly the case with my latest table.
Totally gone, and can't be fixed. After a couple days of being mad as hell about it, and wishing I was using the other open source editor instead of this one, I decided that sometimes good things can happen from a bad thing if you find something positive. With me, it was boredom, I was bored with doing the same stuff, even though it's only been a year since I changed my style with Star Trek. Time for a new generation of style.
Since the pf and the plastics were already first generation anyway, I just threw everything out, and remade everything from scratch, with new techniques, concepts, and improvements over what I learned the last while since I did Kiss. Most of the last 2 weeks was just experiments, and most of the stuff was redone over and over till I was satisfied.
Whether anyone else is satisfied remains to be seen, but then a few people just don't get it anyway. Looking at the Ultracade stuff, it's apparent they need to come a long way, some of the tables are years behind as it is, and this is using a newer version of VP with a lot higher resolution. The thing is you can do things with VP, just because no one else has done it before doesn't mean it's not possible, it just means you have to spend a lot of time working on one little thing till you make it possible.
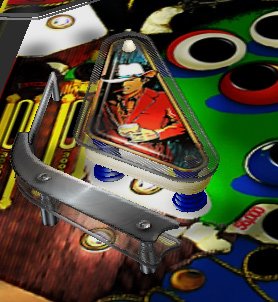
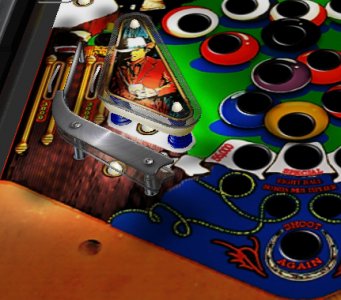
So, in my spare time, I decided to make a table of nothing but experiments. Everything new, everything first generation for me, and see what works and what doesn't. The small screenshot is what works for the left sling. The rest is either not started, or is too early in the process to be shown.
This is all done in photoshop, and all made from scratch, exculding the pf and plastics of course, the orginal images are somewhere under all that. Even so, there are new concepts and blending, most importantly, the fact that I no longer care to make the tables "real", as it's rather pointless when we use it on such a imperfect program. I'm not making "real" tables anymore, I'm making a computerized painted version of the table. People get so hung up on that, why make a "perfect" "realistic" table when you have the ability to make the table even better?
It's a very small screenshot, but what you see are several new ideas from me. Rounded rubbers with textures, a new transparency effect with lighting and shadows, new metals, a new image technique for small scale walls, as well as new graphics and odds and ends.
Rubbers and metal are images on a wall, not decals, and yes, it was a massive pain in the ass. As far as I know, I haven't seen another example of adding the kind of depth without using decals, especially with such small scale objects. VP not only has a far lesser resolution to the wall object in terms of images than decals, it also has far less color depth as well. It's ability to display a large amount of colors is limited, and colors within a color range blend in, so instead of a nice grey metal with light sourcing and detail streaking, you end up with a big white blob instead. Add to that VP will automatically shade a side whether you want it to do so or not, and it makes a lot of things harder to do. Most people just use decals, but I don't, I find they just cause different problems.
Though I am 60% successful, I have managed to get a texture to match the rounded rubbers and still defeat the auto shading, and though VP makes it fuzzy, done the same for the wire rail as well. There's only about 5 pixels in width to work with, (the side is turned off) yet I managed to get a depth in the image enough so far so it looks like a metal wire as opposed to a blob. I wish there was a trick to it, but it's a case of spending hours in Photoshop working on it till it looks right. The rubbers had the same problem, the lack of color depth especially.
The transparency I cooked up for ramps, but it works very nicely for anything that uses a clear plastic. The method I use also adds the shadows and the light sourcing from the surrounding objects as well as reflections, and is adjustable. This uses decals, but still allows me to use Lighting GI as well. Would be nice if the tops of the wall object can accept a transparency, then it would be real effective.
So here you go, a little screenshot of my work so far. As you know with me, things are subject to change, I'm just as likely to scrap everything and replace it with something else.
Totally gone, and can't be fixed. After a couple days of being mad as hell about it, and wishing I was using the other open source editor instead of this one, I decided that sometimes good things can happen from a bad thing if you find something positive. With me, it was boredom, I was bored with doing the same stuff, even though it's only been a year since I changed my style with Star Trek. Time for a new generation of style.
Since the pf and the plastics were already first generation anyway, I just threw everything out, and remade everything from scratch, with new techniques, concepts, and improvements over what I learned the last while since I did Kiss. Most of the last 2 weeks was just experiments, and most of the stuff was redone over and over till I was satisfied.
Whether anyone else is satisfied remains to be seen, but then a few people just don't get it anyway. Looking at the Ultracade stuff, it's apparent they need to come a long way, some of the tables are years behind as it is, and this is using a newer version of VP with a lot higher resolution. The thing is you can do things with VP, just because no one else has done it before doesn't mean it's not possible, it just means you have to spend a lot of time working on one little thing till you make it possible.
So, in my spare time, I decided to make a table of nothing but experiments. Everything new, everything first generation for me, and see what works and what doesn't. The small screenshot is what works for the left sling. The rest is either not started, or is too early in the process to be shown.
This is all done in photoshop, and all made from scratch, exculding the pf and plastics of course, the orginal images are somewhere under all that. Even so, there are new concepts and blending, most importantly, the fact that I no longer care to make the tables "real", as it's rather pointless when we use it on such a imperfect program. I'm not making "real" tables anymore, I'm making a computerized painted version of the table. People get so hung up on that, why make a "perfect" "realistic" table when you have the ability to make the table even better?
It's a very small screenshot, but what you see are several new ideas from me. Rounded rubbers with textures, a new transparency effect with lighting and shadows, new metals, a new image technique for small scale walls, as well as new graphics and odds and ends.
Rubbers and metal are images on a wall, not decals, and yes, it was a massive pain in the ass. As far as I know, I haven't seen another example of adding the kind of depth without using decals, especially with such small scale objects. VP not only has a far lesser resolution to the wall object in terms of images than decals, it also has far less color depth as well. It's ability to display a large amount of colors is limited, and colors within a color range blend in, so instead of a nice grey metal with light sourcing and detail streaking, you end up with a big white blob instead. Add to that VP will automatically shade a side whether you want it to do so or not, and it makes a lot of things harder to do. Most people just use decals, but I don't, I find they just cause different problems.
Though I am 60% successful, I have managed to get a texture to match the rounded rubbers and still defeat the auto shading, and though VP makes it fuzzy, done the same for the wire rail as well. There's only about 5 pixels in width to work with, (the side is turned off) yet I managed to get a depth in the image enough so far so it looks like a metal wire as opposed to a blob. I wish there was a trick to it, but it's a case of spending hours in Photoshop working on it till it looks right. The rubbers had the same problem, the lack of color depth especially.
The transparency I cooked up for ramps, but it works very nicely for anything that uses a clear plastic. The method I use also adds the shadows and the light sourcing from the surrounding objects as well as reflections, and is adjustable. This uses decals, but still allows me to use Lighting GI as well. Would be nice if the tops of the wall object can accept a transparency, then it would be real effective.
So here you go, a little screenshot of my work so far. As you know with me, things are subject to change, I'm just as likely to scrap everything and replace it with something else.