SpacePirateScott
Pinball Wizard
- Joined
- Jan 11, 2024
- Messages
- 93
- Reaction score
- 91
- Points
- 25
- Favorite Pinball Machine
- Scared Stiff
Here is a sneak peak of the new plastics and drop targets that I'm adding to the Roller Disco table. The screen shots and video are from the proof of concept that I worked on this weekend.
I haven't been happy with how the plastics generally look in FP, so I have been poking around with a couple techniques. I am also unhappy with how the drop targets look when lit in low light conditions.
Here is what the plastics and drop targets look like with on a dimly lit table with shadow maps enabled.
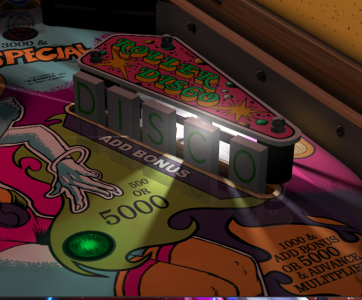
The biggest problem with the shadow maps is that they are not dynamic. When you drop a target light is still blocked even though the target wouldn't be blocking the light in real life.
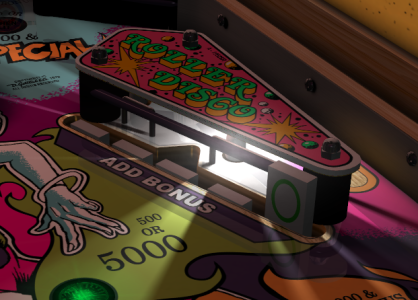
I know that am showing off the worst case here. Normally a table creator would make sure that there is a hardware light illuminating the plastic and drop targets or using the advanced technique of brightening the texture, but what I wanted to accomplish something like this photo of the real table. In the photos of this table it is only lit with the lights on the table and glow from the translight. (note the lightbulb is actually a pink LED, so the colors are a little weird.
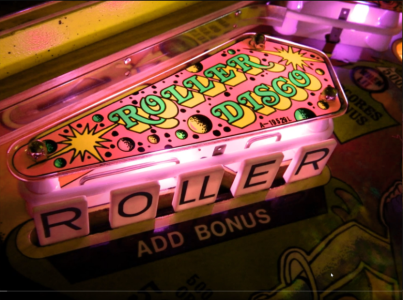
If we examine the photo there are a couple things that tell your brain that this is a clear piece of plastic with a graphic on the back and lit from below. First the graphic is brighter than it would be if it was just lit with the normal lighting. We already have a pretty good way of doing this, although I haven't seen it many tables yet.
Secondly, we can see the playfield in the space between the graphic and the edge of the plastic. And finally, the biggest thing is the light that is reflecting from INSIDE the plastic onto the far edges of the plastic. So if we are able to replicate this then we should be able to make more realistic plastics.
Also note how the plastic drop targets are translucent and are transmitting some the light from the bulb.
I am pretty happy with what I came up with: The plastics look nice, the drop targets are nicely back lit and the shadow maps are updated as the targets are dropped and reset.
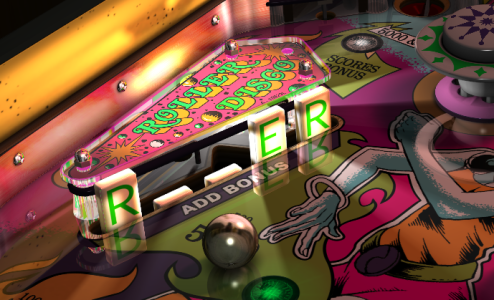
It also looks pretty good in bright light as well, but this demo is just hacked together so I can't toggle the light on an off in real time yet. I will post a video of that when I get it working.
And here is video of the work in progress in action:
So, hopefully, you are thinking, "That's looks not too bad, but how hard is this to set up?"
Well the good news is that you don't need to use blender. (That's always good news)
For the plastics:
- This is all done in the FP editor. It was taking me about three times longer to create one of these plastics than a normal one. You can use generic textures for the reflections and edges, or tweak them in photoshop for a slightly better look. If you want a "lit from below" look, then there will be a couple lines of code to adjust the brightness.
For the back lit drop targets:
- This is just a texture swap and a couple lines of code to brighten the textures. I did make custom textures for this table, but I have made a set of generic ones that will work pretty well. If you want to toggle the light behind the drop targets and have the drop targets look correct, then you will also need to some code to swap the textures.
For the dynamic shadow maps:
- Unfortunately you will need a bunch of patience and some basic photoshopping skills: Open two files, copy the first into a new layer in the second file, and adjust the layer blending modes. The rest is done in the editor and game engine. If you have already created shadow maps and have the above photoshop skills or equivalent then you can do the asset create side.
There is also coding involved. The WIP needs about 30 lines of code, but more will be needed to handle the turning on and off of the light. I am thinking of creating a class to simplify it, so I don't think you will need a lot of programming skills. Just copy/paste from the example and change the names of the textures and models to match your table.
If there is any interest, I will post a full tutorial after I finish the table.
That's it for this week.
Cheers!
I haven't been happy with how the plastics generally look in FP, so I have been poking around with a couple techniques. I am also unhappy with how the drop targets look when lit in low light conditions.
Here is what the plastics and drop targets look like with on a dimly lit table with shadow maps enabled.

The biggest problem with the shadow maps is that they are not dynamic. When you drop a target light is still blocked even though the target wouldn't be blocking the light in real life.

I know that am showing off the worst case here. Normally a table creator would make sure that there is a hardware light illuminating the plastic and drop targets or using the advanced technique of brightening the texture, but what I wanted to accomplish something like this photo of the real table. In the photos of this table it is only lit with the lights on the table and glow from the translight. (note the lightbulb is actually a pink LED, so the colors are a little weird.

If we examine the photo there are a couple things that tell your brain that this is a clear piece of plastic with a graphic on the back and lit from below. First the graphic is brighter than it would be if it was just lit with the normal lighting. We already have a pretty good way of doing this, although I haven't seen it many tables yet.
Secondly, we can see the playfield in the space between the graphic and the edge of the plastic. And finally, the biggest thing is the light that is reflecting from INSIDE the plastic onto the far edges of the plastic. So if we are able to replicate this then we should be able to make more realistic plastics.
Also note how the plastic drop targets are translucent and are transmitting some the light from the bulb.
I am pretty happy with what I came up with: The plastics look nice, the drop targets are nicely back lit and the shadow maps are updated as the targets are dropped and reset.

It also looks pretty good in bright light as well, but this demo is just hacked together so I can't toggle the light on an off in real time yet. I will post a video of that when I get it working.
And here is video of the work in progress in action:
So, hopefully, you are thinking, "That's looks not too bad, but how hard is this to set up?"
Well the good news is that you don't need to use blender. (That's always good news)
For the plastics:
- This is all done in the FP editor. It was taking me about three times longer to create one of these plastics than a normal one. You can use generic textures for the reflections and edges, or tweak them in photoshop for a slightly better look. If you want a "lit from below" look, then there will be a couple lines of code to adjust the brightness.
For the back lit drop targets:
- This is just a texture swap and a couple lines of code to brighten the textures. I did make custom textures for this table, but I have made a set of generic ones that will work pretty well. If you want to toggle the light behind the drop targets and have the drop targets look correct, then you will also need to some code to swap the textures.
For the dynamic shadow maps:
- Unfortunately you will need a bunch of patience and some basic photoshopping skills: Open two files, copy the first into a new layer in the second file, and adjust the layer blending modes. The rest is done in the editor and game engine. If you have already created shadow maps and have the above photoshop skills or equivalent then you can do the asset create side.
There is also coding involved. The WIP needs about 30 lines of code, but more will be needed to handle the turning on and off of the light. I am thinking of creating a class to simplify it, so I don't think you will need a lot of programming skills. Just copy/paste from the example and change the names of the textures and models to match your table.
If there is any interest, I will post a full tutorial after I finish the table.
That's it for this week.
Cheers!
Last edited:

