- Joined
- May 3, 2016
- Messages
- 3,137
- Solutions
- 7
- Reaction score
- 2,488
- Points
- 145
- Favorite Pinball Machine
- Attack From Mars
Over the years, I’ve had ongoing issues with captive balls. I often found that the ball would strike the captive ball but only move it slightly—or, in some cases, it would bounce off the surrounding pegs without moving the captive ball at all. I attempted to widen the gap between the posts, but this introduced the risk of the ball falling out. While working on the Williams version of Indiana Jones, I noticed that a previous table developer had used a rubber post on each side of the captive ball enclosure. This solution worked extremely well.
When I began working on Galaxia, I encountered the same problem again. I decided to try the technique used on Indiana Jones. However, the FP model of the rubber post used on Indiana Jones (a T1 post) was too large to fit on Galaxia. I experimented with two alternatives. The first was a small rubber post used on Medieval Madness. The second method involved using a round post created from a surface by a previous Indiana Jones table developer, with the Material Type set to rubber or plastic.
Both methods worked, though I discovered that the small rubber post only functioned correctly when its elasticity was set to "hard." On the post created from a surface, FP does not have an adjustment for hardness of the rubber on a surface. Evidently, FP assigns a surface with a material set to rubber to hard elasticity because I don't think it would have worked if it wasn't. The materials for rubber or plastic on the surface posts worked similarly. The rubber material has a little more bounce than the plastic but both worked. I suggest trying both.
Ultimately, I chose to use the round post made from a surface with the rubber material setting, as the small rubber post looked out of place next to the larger T1 post. I was able to give the round surface post a metallic appearance by applying the sphere-mapped "[chrome-silver]" texture. Since I had integrated FizX into Galaxia, I renamed the posts to Metal1 and Metal2 so that the automatically generated ball hit sound would produce a metallic effect instead of a rubber one.
I’ve attached a demo table that showcases both methods. I also included an overlay used to measure the gap between the posts, with each side set to 22 mm. A gap of 23 mm also works. In my experience, a 22 mm or 23 mm gap tends to deliver the best performance.
Update: I deleted the attachment of the first captive ball demo because the physics of the naive FP are so bad. I added the captive ball demo to my FizX template and attached it. Be sure to add the zip of the FizX 1K ball to the table if you want it to play correctly.
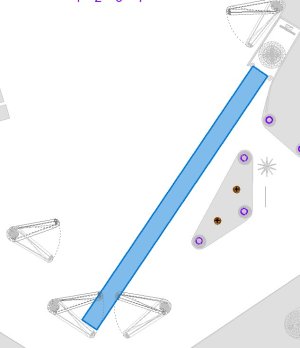
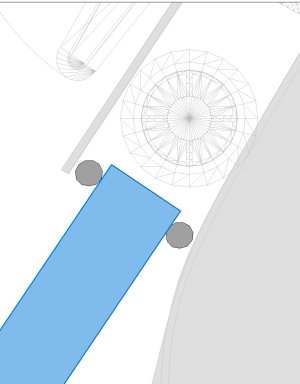
Update 5/12/25: I have discovered another method that improves performance of the captive ball. This method adjusts the angle of the two posts for the captive ball. First add an overlay on the table and set the height to 400 or 500 mm and leave the width set to the default. Then set the rotation so it is oriented between the flipper that is normally used to hit the captive ball and the captive ball as shown on the first screenshot below. Once you get the rotation correct, make the width wide enough so it spans both posts as shown on the second screenshot. You then use the overlay as a guide set the position of both posts so they just touch the overlay. Once you have that adjusted, you can change the width of the overlay to 22 or 23 mm and use the overlay as a measurement device to set the gap between the two posts as shown in the third screenshot.
Of course this method works when there is there only one flipper that would normally make the shot. On the table I am editing in the screenshots, the captive ball might be hit by the left upper flipper but it is intended to be used to hit a target above the captive ball.
If the captive ball is in the dead center of the table, then you should probably set the posts so they are parallel to the top and bottom of the table. Having the captive ball is in other locations that can be hit by both flippers may require some sort of compromise or or you might choose the primary one.
When I began working on Galaxia, I encountered the same problem again. I decided to try the technique used on Indiana Jones. However, the FP model of the rubber post used on Indiana Jones (a T1 post) was too large to fit on Galaxia. I experimented with two alternatives. The first was a small rubber post used on Medieval Madness. The second method involved using a round post created from a surface by a previous Indiana Jones table developer, with the Material Type set to rubber or plastic.
Both methods worked, though I discovered that the small rubber post only functioned correctly when its elasticity was set to "hard." On the post created from a surface, FP does not have an adjustment for hardness of the rubber on a surface. Evidently, FP assigns a surface with a material set to rubber to hard elasticity because I don't think it would have worked if it wasn't. The materials for rubber or plastic on the surface posts worked similarly. The rubber material has a little more bounce than the plastic but both worked. I suggest trying both.
Ultimately, I chose to use the round post made from a surface with the rubber material setting, as the small rubber post looked out of place next to the larger T1 post. I was able to give the round surface post a metallic appearance by applying the sphere-mapped "[chrome-silver]" texture. Since I had integrated FizX into Galaxia, I renamed the posts to Metal1 and Metal2 so that the automatically generated ball hit sound would produce a metallic effect instead of a rubber one.
I’ve attached a demo table that showcases both methods. I also included an overlay used to measure the gap between the posts, with each side set to 22 mm. A gap of 23 mm also works. In my experience, a 22 mm or 23 mm gap tends to deliver the best performance.
Update: I deleted the attachment of the first captive ball demo because the physics of the naive FP are so bad. I added the captive ball demo to my FizX template and attached it. Be sure to add the zip of the FizX 1K ball to the table if you want it to play correctly.
Update 5/12/25: I have discovered another method that improves performance of the captive ball. This method adjusts the angle of the two posts for the captive ball. First add an overlay on the table and set the height to 400 or 500 mm and leave the width set to the default. Then set the rotation so it is oriented between the flipper that is normally used to hit the captive ball and the captive ball as shown on the first screenshot below. Once you get the rotation correct, make the width wide enough so it spans both posts as shown on the second screenshot. You then use the overlay as a guide set the position of both posts so they just touch the overlay. Once you have that adjusted, you can change the width of the overlay to 22 or 23 mm and use the overlay as a measurement device to set the gap between the two posts as shown in the third screenshot.
Of course this method works when there is there only one flipper that would normally make the shot. On the table I am editing in the screenshots, the captive ball might be hit by the left upper flipper but it is intended to be used to hit a target above the captive ball.
If the captive ball is in the dead center of the table, then you should probably set the posts so they are parallel to the top and bottom of the table. Having the captive ball is in other locations that can be hit by both flippers may require some sort of compromise or or you might choose the primary one.
Attachments

Last edited:

