- Joined
- Jun 23, 2003
- Messages
- 7,208
- Solutions
- 10
- Reaction score
- 3,172
- Points
- 150
- Favorite Pinball Machine
- Jurassic Park
Below are my thoughts and working methods. I'm using GIMP, but Photoshop and many programs work the same way.
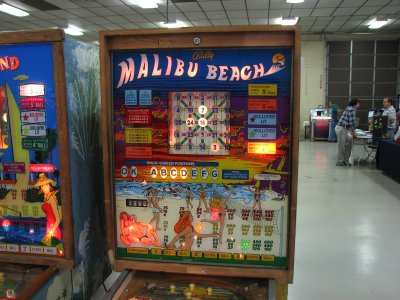
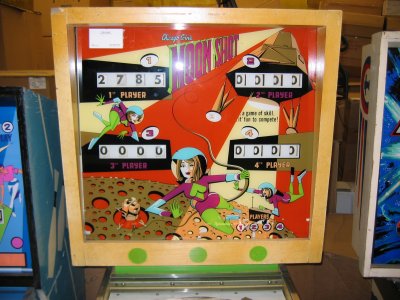
How to reconstruct a skewed photo?
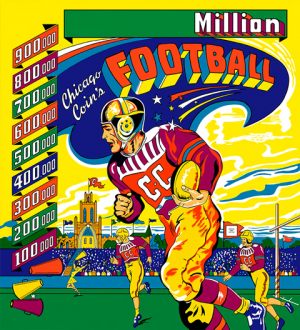
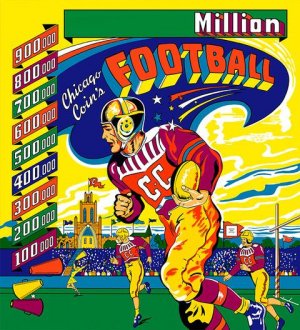
How to take a small source image (with issues) and use AI to expand it properly?
BigJpg.com and Waifu are fantastic for this, as exampled below.
How to auto-remove obvious artifacts?
Enhance filters starting with Noise Reduction are the usual way, but the two tools mentioned just above are super-easy to use and incredibly effective. Almost like magic, really.
Note that the more an image is composed of distinct lines and uniform colors, the better the two sites will work on these issues. Also note that it's best to use just enough noise reduction to clean up. Using too much will lose detail in your image.
How to remove yellowing or specific color oversaturation?
Choose Colors / Hue-Saturation, then select the color you want to work on. (note: if your color isn't directly based on the six RGB / CYM colors, then you might need a different method) Drag the Saturation bar to the left to decrease that color. Then drag the Overlap slider to the right in order to make a smoother transition from your base color to similar colors, for example green and red if you're working with yellow.
How to restore contiguous areas using surrounding areas as a source?
There are in fact lots of methods. To maintain a certain level of color & texture variance, the Clone tool followed by the Smudge tool is a classic. If a single fill color works, then bucket fills set to a sufficient transition can work. The paintbrush with various brush settings can also work, such as the airbrush and/or using non-100% brush opacity. Maybe easiest of all is to simply select, copy, and paste from a nearby region, then smooth as necessary. Heal tools can also work, particularly for more complex areas, by auto-using surrounding regions to reconstruct the focus area.
When is it worth re-creating by vector tools?
Probably not necessary in most cases, as it can be a lot of work, plus it's hard to capture the color & detail nuance of the original in a really satisfying way. That said, older and simpler backglasses will work the best, and can probably be 'textured' to look more realistic as the final step.
Reconstructing playfields by vector tools is probably time better spent, as they tend to be simpler than their corresponding backglasses.
What's a fairly easy, effective way of reducing glare & light reflections?
I don't quite understand the methods I'm seeing so far, likely because I haven't used them before. Would be really nice if there was a filter or smart tool I could apply to an area, but I'm not sure it's that simple.
How to remove watermarks?
So far the "sharpen by synthesis" tool I installed has been disappointing. Main issue with PBA's stuff is that their watermarks work by decreasing gamma / saturation in order to create lettering. Problem is-- so far the anti-watermark stuff I've Googled assumes that the lettering is dark or black, and therefore that the way to fix it is to pull in surrounding elements to reconstruct the 'destroyed' letter area. *Bzzp* Note: I also want to point out here that the object is not to steal PBA's stuff, potentially cutting in to their business model, but simply to help improve backglasses to be used in pin-sim projects.
Hmm, anything else...?
How to reconstruct a skewed photo?
| 1) Crop the image as closely as possible without losing any of the artwork. Note: If a backglass is sitting in the backbox, some of the art is likely going to be cut off by either a frame or the edges of the wooden backbox. I usually try to crop right to the edges of the visible art instead of accidentally including any frame edges. Because redrawing the lost edge areas and reconstituting the original size is a lot more work, usually not necessary. |
| 2) Use GIMP's Transform / Perspective tool to pull the visual corners of the artwork all the way to the physical corners. Start with the most skewed corners to help better adjust the other corners. Zoom way in to make sure of your accuracy. Circle around the four corners of the image at least 2-3x to make sure everything is adjusted just the right amount. Save, and you're done. Note that this approach will automatically correct a certain amount of 'fisheye.' |
|
Note: If the image has lots of fisheye, and you don't want to lose a bunch of edge
area, you'll want to start step one without fully cropping. Instead, turn on grid
mode and try to crop about 3-4 units larger than you normally would. The extra space
created here will allow you to preserve the bulging edge sections for the time being.
Perform step two as usual, aiming to unskew the image evenly, again leaving a four
pixel margin around the corners. And then:
|
| 3) Go to Filter / Distort / Lens Distortion and adjust either the "Main" or "Edge" slider until the edges are straight. A gentle hand is required here, as you only want to correct the edges, not throw off the rest of the image or alter the corners which you already corrected. |
| 4) Finally, you can crop away the margin to produce your finished piece. |
| 5) If necessary, you can then resize the image according to accurate backglass dimensions using references like this. Just remember that even with the straightening work you've performed, the image you produced is probably missing some of its margin if it was photographed in the machine's backbox. So you might want to correct for that, depending. |
How to take a small source image (with issues) and use AI to expand it properly?
BigJpg.com and Waifu are fantastic for this, as exampled below.
How to auto-remove obvious artifacts?
Enhance filters starting with Noise Reduction are the usual way, but the two tools mentioned just above are super-easy to use and incredibly effective. Almost like magic, really.
Note that the more an image is composed of distinct lines and uniform colors, the better the two sites will work on these issues. Also note that it's best to use just enough noise reduction to clean up. Using too much will lose detail in your image.
How to remove yellowing or specific color oversaturation?
Choose Colors / Hue-Saturation, then select the color you want to work on. (note: if your color isn't directly based on the six RGB / CYM colors, then you might need a different method) Drag the Saturation bar to the left to decrease that color. Then drag the Overlap slider to the right in order to make a smoother transition from your base color to similar colors, for example green and red if you're working with yellow.
How to restore contiguous areas using surrounding areas as a source?
There are in fact lots of methods. To maintain a certain level of color & texture variance, the Clone tool followed by the Smudge tool is a classic. If a single fill color works, then bucket fills set to a sufficient transition can work. The paintbrush with various brush settings can also work, such as the airbrush and/or using non-100% brush opacity. Maybe easiest of all is to simply select, copy, and paste from a nearby region, then smooth as necessary. Heal tools can also work, particularly for more complex areas, by auto-using surrounding regions to reconstruct the focus area.
When is it worth re-creating by vector tools?
Probably not necessary in most cases, as it can be a lot of work, plus it's hard to capture the color & detail nuance of the original in a really satisfying way. That said, older and simpler backglasses will work the best, and can probably be 'textured' to look more realistic as the final step.
Reconstructing playfields by vector tools is probably time better spent, as they tend to be simpler than their corresponding backglasses.
What's a fairly easy, effective way of reducing glare & light reflections?
I don't quite understand the methods I'm seeing so far, likely because I haven't used them before. Would be really nice if there was a filter or smart tool I could apply to an area, but I'm not sure it's that simple.
How to remove watermarks?
So far the "sharpen by synthesis" tool I installed has been disappointing. Main issue with PBA's stuff is that their watermarks work by decreasing gamma / saturation in order to create lettering. Problem is-- so far the anti-watermark stuff I've Googled assumes that the lettering is dark or black, and therefore that the way to fix it is to pull in surrounding elements to reconstruct the 'destroyed' letter area. *Bzzp* Note: I also want to point out here that the object is not to steal PBA's stuff, potentially cutting in to their business model, but simply to help improve backglasses to be used in pin-sim projects.
Hmm, anything else...?
Last edited:


![Football (Chicago Coin, 1949) [960x1056] (Waifu2).png](/forums/data/attachments/20/20294-ccf58a3a9c93f6843aed776a8cd5bbd0.jpg)


 - IPDB.jpg")