by francisco666, GeorgeH, rom
at 2020-01-09
Type Recreation (real pinball)
Manufacturer Sega Pinball, Incorporated (1994-1999), Chicago, Illinois, USA
Tradename Sega
Date 1995-10
IPD No. 3592
Video
Description
at 2020-01-09
Type Recreation (real pinball)
Manufacturer Sega Pinball, Incorporated (1994-1999), Chicago, Illinois, USA
Tradename Sega
Date 1995-10
IPD No. 3592
Video
RulesNOTE: This table uses Dynamic Flippers, Lighting and Shadow Maps that require use of BAM v1.4-267 (or later) to be installed which was released on November 9, 2019. It is very easy to upgrade. You can download the most current version at the following link. This installation file installs Future Pinball and BAM at the same time. If you have either Future Pinball or BAM already installed, you can still run it and it will bring everything up to date.
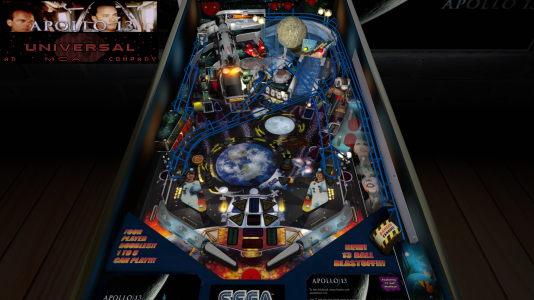
One of the guys on the forum found a scanned version of an Apollo 13 playfield and suggested I update this table. At first, I thought this table didn't need it because the existing playfield was already high resolution. I decided to piece together a rough copy and added it to Francisco and Rom's version of the table. The color of the scanned copy is much better than the original so I decided to update it. I then noticed other things that I thought could be changed to improve the visual appearance. I ended up performing many of the same things I changed on my version of the "Phantom of the Opera" table that was so popular.
The table normally plays a 2048x4096 version of the playfield texture which I reduced in size from the working copy. I included the working copy in the download which has higher resolution at 2461x5410. If you have a large 4K display on a pinball cabinet, you might want to use it instead of the normal version. You can just delete the texture with the same name in the Texture Manager and add it but be aware it will require more system resources.
Francisco and Rom's table used standardized rectangular light inserts on the playfield that didn't actually fit the shape of the light. I probably spent way too much time converting all of them to shaped lights. ...But the time was worth it because the table looks so much better now.
This is the first time I have ever used "bump maps". The moon was dramatically improved by using them. The model of the moon is smooth but the real table has craters. A bump map dramatically improves it by adding the much needed craters. I also added a bump map to the model of the Lander after changing the color a bit. I created a bump map for the rocket but it proved to require more resources than my graphics card could handle. My PC would render the rocket but then would change the rendering of the shadow of the ball so it was red. I decided to not use the rocket bump map because it didn't actually improve the appearance of the rocket all that much. I added the texture for it in the download if you want to experiment. All that is needed is to add the texture to the "Texture Manager" in the FP editor and BAM will add it automatically. Many thanks to Gimli who helped me learn how to create the bump maps.
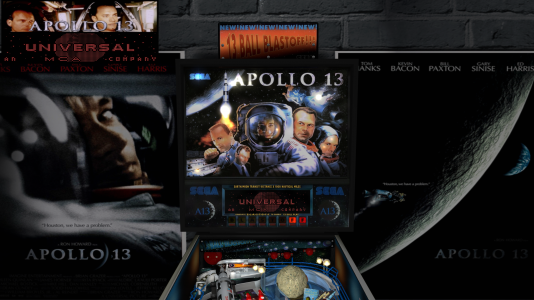
I set up the BAM lighting that I have been adding to all the recent tables I have modified. You press the "Special 1" key repeatedly to cycle through the options. The playfield has what appears to be an LED that displays numbers below the rocket. These have always been too dark but the new BAM lighting options allowed me to brighten the LED quite a bit. I have posted instructions on how to add your settings to the option for "End User Settings". Be aware that the bump maps I discussed previously require the use of "New Renderer" lighting. The option, "FP Original", will not display the bump maps because it does not use "New Renderer". This option is intended to be only used on low end PCs that can't support "New Renderer".
There are many other things I did to improve the appearance of the table. 1) I added 4 table loading textures. 2) The table was set up with a virtual game room although the posters on the wall were much darker than the rest of the room. I darkened the area around the posters to match the posters. 3) I added coding to make the HUD toggle work so it saves your setting to the fpRam file and added an overlay to the HUD DMD. 4) The color wasn't right for the texture on the backglass so I edited it to make it look like videos I had watched of the original table. 5) The back board has a topper that was too dark so I lit it up. 6) I changed the DMDs so the background color is black. There is a "zip" file included in the download that changes the unlit dots on the DMD to be black also. I prefer having the unlit dots match the background color. The effect is rather subtle so you may not want to use the "zip" file. Note that the zip file does not contain an XML file. The XML has been added to the script. 7) I changed the apron to make it darker and added new instruction cards. 8) I added shadow maps that required I make some changes to the bulbs under the slingshots. 9) I edited the texture for the plastics.
Francisco should be commended for doing such a good job scripting this table. I have not encountered any serious bugs in all my testing. Francisco added a code to the script where you can add a ball to the table if needed (press "B" on on the keyboard but only if definitely needed to finish the game). I have never needed it even after 13 ball play is completed which I think is where a problem is most likely to occur. I only made two changes that improve the game play. 1) The right kicker that starts missions and the video mode shot the ball out to the left side of the table. I watched several videos of the real table and noticed that this kicker shoots the ball toward the right flipper. With some difficulty, I changed the location of the kicker and it's angle to aim it toward the right flipper. ...So be prepared to activate the right flipper when the ball kicks out or the ball will drain. 2) I also noticed that when the ball exits the rocket on real tables, it hits the right flipper near the tip. I changed the ramp for the rocket slightly so the ball hits the same spot when it exits the rocket. On the previous version, the ball would often drain when exiting the rocket.
The original table had several "execute" commands in the script. I converted these to the long form in order to prevent Microsoft's Defender antivirus (which is included in all versions of Windows now) from scanning these "execute" commands. Scanning these commands during game play can slow the PC down and cause stuttering (low frame rate).
As always, I added custom physics and dynamic flippers to this table. You can make changes to the flipper settings and many other settings in the script. The script has detailed instructions in the comments on how you can make changes in desired.
The original script divided the final score by 10 to avoid what is called high score overflow. Future Pinball has a limit for the score of about 2 billion before the game produces the error message for overflow and stops all game play. BAM extends the high score to 922 trillion when a code is added to the script. I have added the code and tested it to verify it works. To everyone's relief, I removed the coding that divides the score by 10. The DMD can display a score up to about one point less than 10 billion. In the unlikely event that someone would exceed this, the score would just be truncated. The full score would then be added to high score list with no overflow or any error messages produced.
Update January 31, 2020: You must use the new BAM high score screen in order to extend the high score overflow from 2 billion to 922 trillion. This option is installed by default so if you have never changed it, there is no need for any action. I have read that some pinball cabinet users set up the flippers to be operated by the left and right arrow keys. They then experience the cursor jumps 2 spaces when entering a high score. For this reason, they changed BAM to use the old high score screen. Using the old high score screen will result in the high score overflow reverting back to 2 billion points. Ravarcade posted a new beta that fixes the issue for flippers being operated by the left and right arrow keys. Just replace the "PinballHighScore.dll" file in the BAM\Plugins directory with the one linked below.
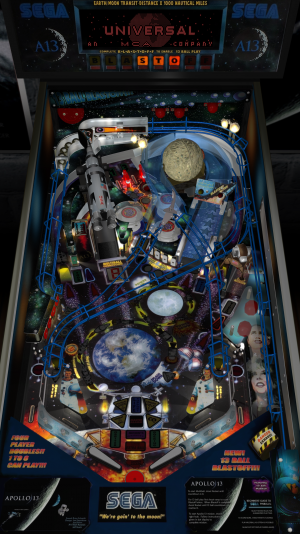
I added a version of the table that I call "rotated display". This is intended for those of us that has a desktop PC and can rotate the monitor so it is in portrait format. It improves the display if you are able to orient your display this way. There is a screen shot of on the Images tab of this posting. I recommend that pinball cabinet users use this version also although you should ignore the cfg files in the download and the instruction pdf file. Pincab users should just set the table up the way the normally would. This version has the HUD set up so it defaults to being turned off. The table loading texture is already set to one of the portrait versions. There is also a set of instructions that appears when you press "I" on the keyboard. The setup for 270 degrees rotation squeezes that display together so much that it is hard to read. I stretched it so it displays correctly.
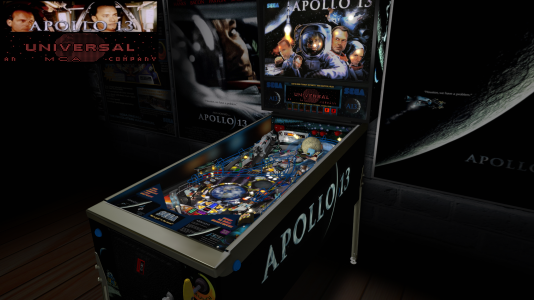
I must say that all the visual changes to this table make it look beautiful! Francisco and Rom's version 1.0a has always played well and Rom's models look excellent but I think the changes I made improve the appearance quite a bit. I hope you enjoy playing it.
George
This table is a mod of :
Apollo 13 1.0a
InfoPress "I" during the game to display the rules and instructions, change pages with flipper buttons, and press "I" again to close instructions. These do not pause the game, so you must have control of the ball.
I added four table loading textures. Two of the textures that are saved to the table are oriented in landscape format and the other two are oriented in portrait. I recommend that a portrait version be used in pinball cabinets. All of the textures have been saved to both versions of the table. If you would like to switch to different texture, open the Future Pinball editor for the table and click on the "Tables" pull down menu. Then select the "Table Info" option. Under the option for "Loading Picture", you can select the following:
LoadingLandscape1.jpg
LoadingLandscape2.jpg
LoadingPortrait1.jpg
LoadingPortrait2.jpg
Press "B" to add a ball if for some reason the machine looses one.
There are many settings that can be changed near the top of the script. Directions on how to change the settings are included in the comments of the script.
Changes for Low End PCs
For those of you that have low end PCs, these are a few things that you can try although they will disable some of the features I discuss in the description.
1) First, try the "FP Original" lighting option. It will change the lighting so it does not use "New Renderer" which requires more memory. It also disables the bump maps. The other lighting options use "New Renderer". If you want to try using "New Renderer", you can also delete these 2 files from the Texture Manager:
MoonLander-NormalMap
MoonTexture-NormalMap
The Moon Texture is a more desirable bump map to use than the Moon Lander.
2) The shadow maps might affect system performance. You can delete them by opening the script and deleting everything from
' SHADOW MAP SECTION
to
' End of shadow maps
The first four bulbs in the shadow map list are for the slingshots and are the most desirable ones to retain. You might try deleting all but the first 4 shadow maps.
3) I added 3 flashers to this version. You could try reducing "Hardware Lights to use" on the preferences menu by 3 or just change to 0 to disable them.
4) I added the table loading texture. You could try setting it to "None" to see if that helps. Open the Future Pinball editor for the table and click on the "Tables" pull down menu. Then select the "Table Info" option. Under the option for "Loading Picture", you can select "None".
These are the directions on how to add your light settings in the script for the option "End User Setting":
1) Play the table and press the "Special 1" key repeatedly until the option "End User Settings" appears.
2) Open the BAM menu and open the menu option "Lights".
3) Make the changes you desire to the lighting.
4) While on the "Lights" menu, hold down the "Ctrl" key and type the letter "C". This will copy the settings to the clipboard.
5) Press the "Esc" key to end the game.
6) Open the script in the FP editor.
7) Using the "Edit" pull down menu and "Find", search the script for the text:
Your Settings
8) Place your cursor on the blank line below this text in the script:
' Enter Your Settings Here
9) Hold down the Ctrl key and type the letter "V". This will paste the settings into the script.
11) Delete the following line in the content that you pasted:
Sub SetLightsParamsInBAM()
12) Also delete the following line in the content that you pasted:
End Sub
13) Exit the script and save changes.
14) Now when you play the table and press the "Special 2" key to display the option, "End User Settings", the settings you saved to the script will be displayed.