No_Good_Gofers
by Destruk, TAB
IPD No. 4338
Thanks to Jeff Newton for help with the original table.
Thanks to Kristian for backbox header.
Thanks to shiva for the playfield image.
Rules:
by Destruk, TAB
IPD No. 4338
Thanks to Jeff Newton for help with the original table.
Thanks to Kristian for backbox header.
Thanks to shiva for the playfield image.
Rules:
This rulesheet is copyright 1998 by Keith P. Johnson. It may be freely distributed with or without changes as long as no profit is made. All acknowledgements must be given to me and anyone listed as having contributed. I retain any and all rights to this guide.
Comments, corrections, additions, flames, etc. may be sent to me.
Thanks
Some help from:
* Louis Koziarz
* John Zmaczynski
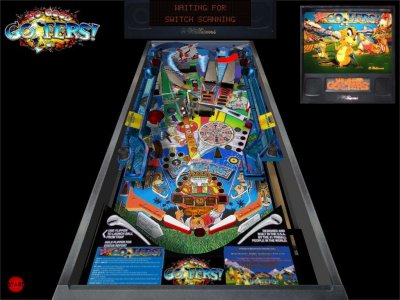
Playfield
There are many shots labelled "drive", which you need to shoot to advance to the Putting Green. They are:
* Left orbit
* Left ramp
* Center ramp
* Right ramp
* Right orbit
Starting with the flippers and going approximately counter-clockwise:
Flippers
2 fairly normal Williams flippers.
Slingshots
2 fairly normal slingshots.
Left inlanes
There are 2 of them. The leftmost left inlane lights the right orbit for the next orbit award and is the return path for the left and center ramps. I'm not sure what the right left inlane does, if anything. Either will lower the driving range ramp if lit.
Left outlane
There's a kickback here! First Lawlor game with a kickback since his first, Banzai Run. Can be lit for extra ball.
Sand Trap kicker
A small saucer above the curve for the left outlane kickback. You can't really shoot this directly, most of the time balls will just bounce into it.
Sand Trap standup
Just to the right of the saucer, it's what lights the Sand Trap kicker.
Jet Bumpers
3 jet bumpers, not quite in a triangle, more above each other. Generally, you'll only get action between 2 bumpers at a time. The bumpers generally increase the Sand Trap value.
Advance Jet Bumpers standup
A little blue standup just to the left of the left orbit entrance. Each hit advances one Jet Bumper. See the bumpers section for more details.
Left orbit
Called the Cart Path by the game usually. Usually goes all the way around the back of the game to the upper right flipper. Weak shots may fall into the back of the Putting Green.
Left spinner
A fairly standard shiny spinner.
Captive ball
A dummy fixture in front guards a regular pinball with a short path with a switch in it (like the TOM setup, but a much shorter ball path). It lies just to the right of the left orbit entrance.
Driving Range ramp
A fairly wide ramp (about 2-3 pinball widths) that is usually UP. When activated (lowered), you can shoot the ramp to access targets above the normal ramps.
Skill Shot targets
Just above the playfield from the Driving Range ramp and just below the entrance to the left ramp.
Left ramp
Very much like TAF's left ramp. Scores Jackpots and pretty much always lights the left inlane for an immediate Driving Range shot. You can usually plunge the ball directly up the ramp instead of aiming for the Skill Shot targets. Feeds to the left left inlane.
Putting Green
A big hole in the back left of the playfield. You can shoot it from either of the right flippers. Also, there is a hole behind the putting green so that slow-rolling balls in the orbit can also score the Putting Green. Balls are usually kicked out into the Jet Bumpers, but it can also be kicked out high-speed to the right flipper. Extra ball can be lit here.
Driving Range
This is basically a clear sheet of plastic above the playfield. It is only accessible via the Driving Range ramp. The ball can hit the Cart, Hole-In-One, center ramp, or dribble off to the left into the left orbit or off the bottom of the range back onto the center of the playfield.
Golf Cart
Just a big plastic golf cart-looking thing with a couple of stand-up targets on it. You can hit it from either bottom flipper off the Driving Range ramp.
Center ramp
Pretty much right in the middle of the playfield in the back. This (and the right ramp) can have 3 states: Down, so you can shoot the ramp; up, so you can shoot under the ramp; up with a gofer, so you can smack the gofer. Bud lives under the center ramp. The ramp itself is generally only makable from the left flipper, but Bud can be hit from all 3, and under the ramp from the bottom flippers (sometimes the top flipper with a little help). Feeds to the left left inlane. If you shoot under the ramp, it goes to the Putting Green and can be kicked out into the Jet Bumpers or the right flipper.
Hole-In-One
The hardest shot in the game (and not surprisingly, probably the most important). It is on the Driving Range, and basically drops down between the center and right ramps. There is a little mini-ramp on top of the driving range that blocks the shot a bit. It is still possible to shoot a ball onto the driving range and up the mini-ramp, but a lot of shots are just ricochets off of the Golf Cart.
Right ramp
Right next to the center ramp. Pretty much everything under the center ramp applies to the right ramp, except that Buzz lives under the right ramp. It feeds the right inlane. If you shoot under the ramp, it kicks out to the right orbit for a slow upper-right flipper feed.
Right orbit
Very similar to the left orbit, but it's on the right, see. It's "entrance" is quite a bit higher up on playfield (next to the right ramp).
Right spinner
Another spinner, exactly like the left spinner. Just a bit up from the orbit entrance.
Upper right flipper
Just a normal flipper, in about the same position as TAF's. You can shoot the left ramp, Putting Green, and the Gofers with it.
Plunger lane exit
Just under the upper right flipper. Slow plunger shots go into the skill shot standups, hard ones go up the left ramp.
Plunger
A combo plunger.
KICK standups
There are 5 standup targets, one for each letter of KICK which face the upper left of the playfield, and one that faces the left flipper.
Wheel
Just a bit to the right of the Driving Range ramp, it serves a couple purposes. First of all, it indicates what you'll get as a reward for finishing the current hole (pointed to by the yellow arrow at the bottom of the wheel). Secondly, it has a special "grabby" surface so it can interfere with the ball path when spinning (much like Whirlwind's spinners).
Right outlane
Can be lit for special.
Right inlane
Lights the left orbit.
Gameplay
Skill Shot
The Skill Shot is available to you at the start of each ball, extra ball, and after any lock that serves a ball to the plunger. You have a choice: You can pull the plunger hard, and the ball will go up the left ramp (and collect anything if it's lit on there) and to the left left inlane for a free Driving Range shot. Obviously you can potentially get a Hole-In-One. You can also plunge fairly lightly and aim for the Skill Shot targets. If you hit these, you get 750K+250K each one (don't know of a limit yet) as well as light the Putting Green for the current hole (if it isn't already).
There is a 5-second or so ballsaver at the start of each ball.
Cart Paths
Between the flippers are 6 lights, which indicate the next Cart Path award. Cart Path awards are given when you shoot an orbit after lighting it from the right inlane (for the left orbit) or the left left inlane (for the right orbit). The awards are:
* Bonus 2x
* Increase Cart Path
* Bonus 3x
* Increase Cart path
* Bonus 4x
* Bonus 5x + Light extra ball
The flashing award indicates what you'll get next. The awards reset at the start of every ball. It doesn't look like you get anything extra after you get 5x + light extra ball. You only get one Cart Path award per inlane trigger. You can only get the extra ball from Cart Paths once.
Orbits score 50K+50K for each consecutive shot. I believe getting "Increase Cart Path" bumps up the base value by 50K (i.e. 100K+50K/shot and 150K+50K/ shot). That resets each ball as well.
Each orbit has a big white circle light that flashes when it's lit for the next Cart Path award or for consecutive loop awards.
Kickback
The default is for the kickback to be lit at the start of the game. You can light the kickback by completing the KICK lights or by a Wheel Award. You can even STACK kickbacks! Newer ROMs should tell you in the status report how many kickbacks you have lit.
The KICK targets are aligned like this:
K\
I /
C /
K /
/
Not at that extreme of an angle, but close. You can't hit the KICK standups directly from the left flipper, but there is a 5th that faces the flipper you can hit. To complete KICK, you need to hit each KICK standup twice. The first hit flashes the letter, the second hit turns it solid. Hitting the standup that faces the left flipper spots one hit on one target, so if you have only 1 flashing letter left and the ball on the left flipper, shoot the spot standup to finish KICK.
The default is to let only 1 kickback be "stacked" on an already-lit kickback.
Sand Trap
The Sand Trap value starts the game at around 100K. The Jet Bumpers add around 2.5K/hit to the value (maybe more if they're lit or flashing?), and the Skill Shot targets can add some too (I think). The Sand Trap starts the game lit. When the ball goes into the saucer, your Sand Trap value will start counting down like a hurry-up award. The letters in KICK will start to light up one-at-a-time, like the T2 skill shot or Judge Dredd Air Raid. Your goal is to hit the left flipper button so that the ball, when ejected from the saucer, will shoot across the playfield and hit the lit standup. If you hit the lit standup, you'll collect the remaining Sand Trap value. I think the value continues to go up from where you collected it. If you miss, you don't get the points, but you still continue building in up from the same point.
If the Sand Trap is unlit, hit the wide yellow standup to the right of the saucer to light it.
Jet Bumpers
The Jet Bumpers have 3 states: Off, lit, and flashing. Normally, each ball starts with the middle bumper lit. The Advance Jets standup increases one bumper's level. When all 3 bumpers are flashing, you have Super Jets for the rest of the ball (7.5K/hit I think). Hitting the Advance Jets standup when Super Jets are lit scores 50K. The Jets also add to the Sand Trap value.
You can get Super Jets as a Wheel Award, too.
Captive Ball
There are 5 lights on the captive ball:
Drive
Spots a drive for the current hole. If Putting Green is already lit, probably doesn't do much of anything.
Increase Bud Value
Adds 25K to Bud's award (for the rest of the game).
Increase Buzz Value
Adds 25K to Buzz's award (for the rest of the game)
Increase Cart Value
Adds 100K to the Cart's value (for the rest of the game)
Light Driving Range
Lights the left inlanes for some free shots at the driving range the first time. The 2nd time it awards Ripoff Multiball.
There's also "Collect Ripoff" lights on either side of the "Drive" light.
The game starts with Drive flashing, and every hit collects the current award and lights the next one. The captive ball does NOT reset at the start of each ball, it is held throughout the game.
Left ramp
Every shot to the left ramp adds 100K to the Hole-In-One value (which starts the game at 400K I think). Also, the inlane will lower the Driving Range ramp after each shot to the left ramp.
Driving Range
The Driving Range value starts at around 50K and is increased by 25K or so with each center and right ramp shot. If you shoot the Driving Range and make the center ramp instead of hitting the Cart or Hole-In-One (or missing entirely), you score the Driving Range value. Often times you'll see an animation of a squirrel getting hit by or swallowing a golf ball. (Buzz: "Hey! Don't hit my tree-dwelling cousin!") There's also a car's window that gets hit (complete with car alarm going off :) ) and probably a couple others.
Cart
The Cart can only be hit from the Driving Range ramp. It starts the game worth 100K and goes up 100K via the captive ball Increase Cart Value award. Various numbers of hits will start different modes (see their description under Wheel Awards).
* 3 hits - Cart Attack
* 8 hits - Pop-a-Gofer
* 13 hits - Speed Golf
If you hit the Cart to start Cart Attack and the ball then ricochets into Hole-In-One, DOUBLE Cart Attack starts instead (same thing, all values doubled). Current ROMs don't double anything else.
Hole-In-One
Any time you make Hole-In-One during normal play, you finish the current hole with one stroke and collect the Wheel Award. The points you get for a Hole- In-One start at 400K and go up 100K with each left ramp shot (no known limit). You also score the Super Jackpot and Special here (when lit).
Gofers
Your hosts, Bud and Buzz; they'll come up and taunt you throughout the game. When they do, feel free to give them a good whack! Each gofer hit scores 100K (increased by captive ball awards). During normal play, you'll also reduce the current hole's score by 1 stroke (see Wheel Awards for more details on playing golf).
Bonus
Every hole you complete adds to your bonus based on how many strokes it took you. Each hole has a par value which you'll usually score, but other things can add and subtract strokes. Each Gofer hit subtracts one stroke, each sandtrap and outlane adds one stroke (not sure if a lit kickback adds a stroke or not). There are Wheel awards that can affect stroke counts as well. Obviously, if you get a Hole-In-One, you finish in 1 stroke. You can never finish with fewer than 2 strokes unless you get a Hole-In-One. You can also never finish with more than 7 strokes.
So, for each hole you finish, you'll get for bonus:
* 1 stroke - 250,000
* 2 strokes - 125,000
* 3 strokes - 100,000
* 4 strokes - 75,000
* 5 strokes - 50,000
* 6 strokes - 25,000
* 7 strokes - 10,000
If you haven't finished any holes yet ("This must be embarassing for you!"), you'll get 10,000. Your total is then multiplied by your bonus multiplier, amazingly enough (see Cart Paths).
Multiball
Multiball is a high-scoring affair in NGG (well, it can be anyway). To start multiball:
1. Shoot the center ramp to raise Bud.
2. Hit Bud. If you take too long, you must shoot the center ramp again.
3. Lock the ball under the center ramp.
4. Shoot the center ramp to raise Buzz.
5. Hit Buzz. You'll have to raise him again if you take too long.
6. Lock the ball under the right ramp.
7. Shoot the Putting Green or Hole-In-One to start Multiball.
Once Multiball starts (both: "Attaaaaaaaaaaaaaack!!"), balls will be kicked out of the Putting Green, the bumpers, and the right orbit (if balls are actually locked in the last 2 spots, otherwise they're auto-plunged).
The left ramp scores the Jackpot, which is worth 3.5M+1M (held for the whole game). If you make it, then Hole-In-One lights for the Super Jackpot (and quite a fanfare) which is worth double the last-collected Jackpot.
After collecting the Jackpot, any left inlane will lower the Driving Range ramp for a shot at the Hole-In-One (Bud: "This is my favorite part!"). Making the Super Jackpot relights the Jackpot. You can also relight the Jackpot at any time by shooting the right ramp (so both the Jackpot and Super Jackpot can be lit at the same time). If the Jackpot is lit, the right ramp will be raised (though Buzz will block it every so often to harrass you) for an easier shot to the left ramp.
The third Super Jackpot you make (in the game, not just one multiball) will not earn a double jackpot, but rather the Jackpot value again and an extra ball!
After each Multiball, 2 additional ramp shots are required to raise a Gofer (the "Get TNT" light on the center ramp will be lit). If a Gofer raised to light a lock times out, you only need to make one shot to re-raise him, not all shots.
Playing Golf and The Wheel
The main object of the game is to complete golf holes. To do so, you must shoot drives until the Putting Green is lit. Shooting the Putting Green completes the hole and scores the current Wheel award.
Each hole has a pre-determined par value. I'm fairly sure that this value minus 1 corresponds to the number of drives that you need to make before putting out. If you don't do anything special, making all drives and then shooting the Putting Green will finish the hole with the par value. Any Gofer hit during normal play subtracts one stroke from par. Any outlane or the Sand Trap will add one stroke. See the Bonus section for details on how this affects your bonus score.
The Putting Green, when unlit, scores a Water Hazard (but this doesn't affect your golf score). The Water Hazard is worth from 10-99,990 (it probably works like TZ's Odd Change, i.e. random number of digits, then randomize each digit except the ones).
Making Hole-In-One any time during normal play finishes the current hole with one stroke. On normal settings, completing the 4th hole will give you both the Wheel Award and light the extra ball.
The currently-selected Wheel award can be changed by the Jet Bumpers, the spinners (both incrementally), and the captive ball (spins and stops randomly).
Here is a list of Wheel Awards starting with Hole-In-One and going clockwise around the Wheel:
Hole In One
Finishes the current hole as a Hole-In-One (including the points) instead of how many strokes it would've been.
Bad Shot
If you get this "award" from as a result of shooting the Putting Green, then you finish the hole with 1 more stroke than you had. If you get it as a result of getting a Hole-In-One or picking it from Player's Choice, then it doesn't affect the current hole, but rather starts the next hole already at 7 strokes.
Ripoff
The ball is kicked out to the right flipper from the Putting Green. You have 20 seconds or so to hit the captive ball to start Ripoff Multiball. Ripoff Multiball starts off as a 2-ball multiball. Complete the captive ball lights (5 hits) to add another ball into play (up to 5). There is a ballsaver at the start of multiball and briefly after completing the captive ball.
During Ripoff, each ramp scores 100K+25K/captive ball hit. If you make all 3 ramps, then the ripoff value is doubled.
Speed Golf
This is a 3-ball multiball, with a brief ballsaver at the beginning. Every inlane triggers the Driving Range ramp for a shot at the Driving Range. Its value starts at 250K or so and every switch adds about 1K to the value. The value doesn't go down when collected, just keeps getting bigger.
Free Lock
Spots one lock towards the next multiball.
Player's Choice
The Wheel starts spinning (way too fast for you to stop it where you want), and you push both flippers to stop it and get your reward. Yes, it's possible to get Player's Choice again. :)
Outlanes
The outlanes are lit (Buzz: "You drain, you gain."), the left for extra ball, the right for special. Only one is lit at a time, alternated by the slingshots. Since you have a kickback now, it's possible to get the extra ball and not lose your current ball in play.
Pop-a-Gofer
A 20-second timed mode. Each Gofer hit is worth 1M. Bud and Buzz will usually alternate being up, taunting you the entire time of course.
Warp
Advance a random number (1-3) of holes, but not past hole 9. You CAN warp to hole 9, though, and immediately get Hole-In-One Challenge. Passing 4 will light the extra ball still, and passing 7 will still play Short Circuit.
Q Jackpot
The left ramp is lit for a jackpot until you collect it or the ball ends. It's worth 1M/hole completed. An easy way to collect it is to lock a ball then plunge the new ball up the ramp.
Gofer Attack
The captive ball is lit for a hurry-up. It starts at 1M and counts down (not sure how far). Hit the captive ball to collect the points. The ball is kicked out from the Putting Green to the right flipper.
Cart Attack
Each drive scores 250K+100K (that's all 5 drive arrow shots and the Driving Range center ramp shot). You get a great animation of a Gofer being chased by a MX Missile. (If you look at the Cart plastic, you'll see some missile launching equipment on it.) If you hit the Cart (Buzz: "You hit your own cart!" then either "Do it again!" or "You're dumber than Bud!"), you'll collect the total of all shots you've made since the start of Cart Attack or the last Cart Jackpot.
Light Extra
Ball, that is. This MUST be collected before you drain (on default settings).
Gofer's Choice
A Gofer (Bud most of the time I think) will pick an award for you, out of:
* Super Jets
* Big Points (1M)
* Dance Party
* Some others...
Dance Party is simply a frenzy. Don't remember the scoring exactly at the moment...
Big Spinners
Both spinners are lit for 7,500/spin for the rest of the ball.
Kickback
Adds one kickback light.
Short Circuit (non-Wheel)
After the 7th hole, instead of a normal Wheel award, you get Short Circuit. A value starts at 2M and starts counting up (presumably the award is disqualified at some point, but I haven't let it go yet). First you hit a KICK target (any of the 5) to stop the value, then hit Buzz to collect it.
Hole-In-One Challenge (Wizard Award)
After the 9th hole, you start the Hole-In-One Challenge. You get:
1. Instantly awarded 1M/Hole-In-One you've made to this point
2. Super Jets
3. Big Spinners
4. Ripoff Multiball
5. Million Plus (1M+1M) on the left ramp (don't know of a limit)
6. Hole-In-One lit for Special
Hole-In-One Challenge starts out as a 4-ball multiball (and a brief ballsaver). Since Ripoff is running, it is possible to extend Hole-In-One Challenge by completing the captive ball repeatedly (same 5-ball limit as Ripoff itself). The left inlanes will lower the Driving Range ramp until you make a Hole-In-One. After that, I presume only the left ramp will lower the Driving Range ramp.
Strategies
I won't give you too much yet, since I'm still learning the game myself. Getting Multiball at least once or twice is important, because it can be worth so much. It will be difficult getting it much more than that because of all the center ramps you'll need to hit.
Play the modes. Some modes (like Cart Attack) hold their value throughout the game, and can be worth major points later on. Don't forget about shooting for the Cart Paths for bonus multipliers later in the game since your bonus will just keep getting bigger and bigger. Definitely try to get the extra ball from the Cart Paths as well.
During Ripoff Multiball and Hole-In-One Challenge, definitely wail on the captive ball. 5 hits may seem like a lot, but it's pretty easy to do. I typically like to ensure I always have 3 balls on the playfield. One thing to do is when you have 3 balls, hit the captive ball 4 times, waiting until you drain one before finishing it. This will actually give you 2 balls because of the ballsaver. -- Keith P. Johnson, keeper of rec.games.pinball DynaFAQ Play pinball - it's better on your eyes than video games. :) "Beware what you wish for when you choose immortality... For it is a decision that you will have to live with for a long time." - from The Outer Limits
- ROM------------------>