Road Girls

Preferences - Editor Options and check " Backup Table when saving". Not perfect as it doesn't save versions but at least you keep the original and the .bak last save (plus the working version). The problem remains though if you change more than one thing at a time.

Anyway, don't worry and think positive: All this things make you a better detective :D

You're making nice progress.
 
After all these years I have never noticed the backup option. I will give it a try.

What happened to your PC?
 
A few weeks ago I though the GPU was toast. In the end I had to change motherboard and because of that, new mem and cpu.
But this last two weeks it was just that I wasn't near it. Can't do much on a cellphone and with almost no reception if at all.
 
The halo / lens flare glow on lights is just a simple circular lens flare image...and as you figured out.. the model of the bulb / light doesnt get any actual glow at all.

This is why I needed to use holograms for the lightsabers on Star Wars DSA. The saber bulbs can't create a glow themselves.
 
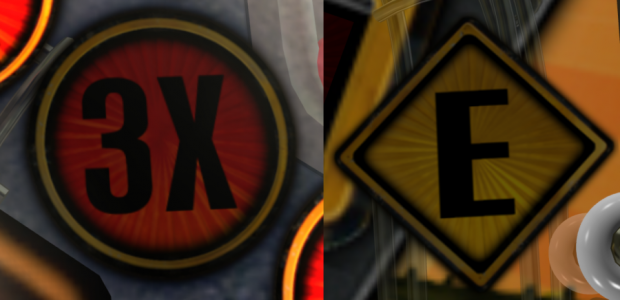
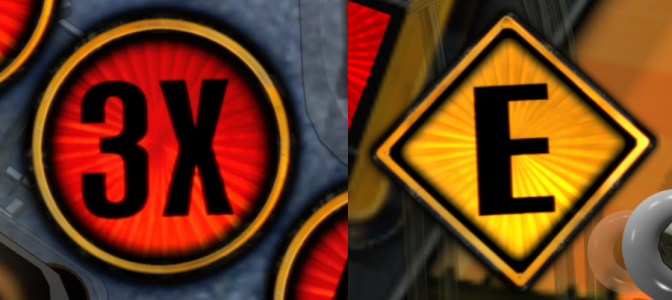
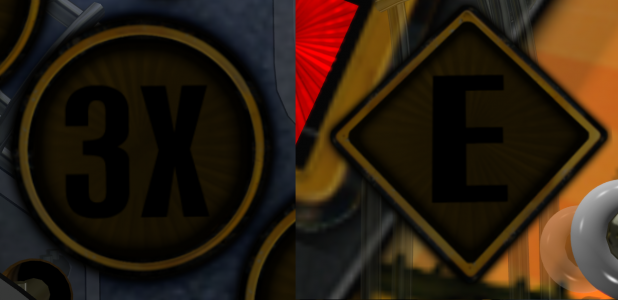
I continue to work on lighting. I noticed that the 3x multiplier light and the "E" above the entrance to the right inlane were always dimmer than the neighboring lights in all versions since the Revisited 1.0 version. It is unusual that Blindmankind decided to use image based lights for these. If it were me, I would probably have used round lights and just turned them on and off as needed. Anyway, I compared the settings for these lights with their neighbors that worked correctly and found no differences. After trying a few things that didn't work, I decided to delete the 2 lights and replace them with copies of their neighbors and then changing the lenses so they matched the deleted lights. Oddly enough, it worked. These are the before and after screenshots of the lights. The "before" shots may look like they are turned off but they are not.

Before change:
1597897325725.png

After change:
1597897356385.png

This is the fixed light turned off:
1597897911685.png
 
nice job here! for information only, regarding the lights, I don't know if you know or use it, but I remember it to you
I found it very useful and much nicer to use this method for the lights...... dynamic light

xxxExt.Brightness =3
xxxExt.GlowRadius = 10
xxxExt.GlowBrightness = 1
xxxExt.SetGlowColor xx,xx,xx


some lights (depends on the color) it is better to take off Glow Radius, so at 0, some is better to leave it, but you can set the color and size

obviously the final result of the lights, it is always determined which setting you use ..... or not ...... if you use the setlightnight or dark ... or custom

I have been using those options but they didn't work on these 2 lights. I think the lights just got messed up somehow when they were added on the Revisited 1.0 version. The table has been modified 4 times since then. I guess no one tried replacing them. It seems like they would have noticed the problem because it is pretty obvious.
 
if you have trouble with these two lights, one solution is to redesign the lights and use "lightimages".... if you want I try to make them myself, but I can't make the insect the same, but a similar one
 
Thanks for the offer Paolo but the lights work perfectly now.
 
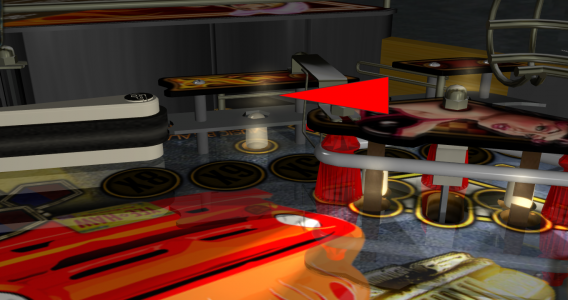
I have decided to add the double bulbs under the plastics like Slamt1lt and Smoke add to their tables. If you are not familiar with it, their set up has a rendered bulb that sets on the playfield and you right click on the bulb and select "Send to back". This function makes the bulb not glow through the top surface of the plastic. Then you add a second unrendered bulb and you right click on the bulb and select "Send to front" which produces a glow through the plastic. Then you raise the unrendered bulb to just below the surface of the plastic or a bit above it. The unrendered bulb needs to be coded in the script and added to light lists so it is the same as the rendered bulb. The coding was a bit more complex that it would be on most tables because Blindmankind added every bulb to several places in the script but I got the job done. After experimenting with it, I think the main advantage of performing this is the glow through the plastics is normally positioned on the plastics. If you look back at the screen shots on message #40 you can see the glow from the same bulbs shown the screen shots below is mostly positioned over the lane. There are also a couple of other advantages to using the unrendered bulbs like you can adjust the glow the way you want and position it even slightly above the plastic to enhance the look more.

This screen shot show the glow from 2 bulbs after the changes (also note the 3x light is working correctly also):
```Road Girls V1.0  (DOFLinx MX)3.png

The red arrow in this screen shot points to the unrendered bulb:

```Road Girls V1.0  (DOFLinx MX).png

You can also see part of the shadow map in the screen shot above that I am working on and I should be finished with all the shadow maps soon.
 
I am trying to fade in/out a flasher, is this suppose to turn it off?
Flasher1Ext.Brightness=0
Flasher1Ext.GlowRadius = 0
Flasher1Ext.GlowBrightness = 0

I don't see anything happening on the table
 
I am finished with the lighting and the shadow maps. It seems like it took forever but it is done. I decided to adjust glow brightness on the unrendered bulbs I discussed in the previous post. They look even better now.

I added more texture lighting in the script (discussed on Message 48) than I have on any table. I counted 24 that I added and I even added them to the plastics and playfield. I have always thought that the playfield on FP has too much reflection and so I reduced it. I have found I can use this method of lighting instead of using so many nanoflashers. As most of you probably know, FP switches flashers to bulbs when more than 7 flashers are turned on at one time so it pays to conserve their use.

I found a copy of the playfield texture that is exactly the same as the one normally used except it does not have the girl spread out on the hood of the truck. It might have a better spousal acceptance factor. I made it switchable to the version with the girl. The screenshot below shows the version without the girl.

I added the switchable modes for Day, Night, Dark Night and Night Glow. No one complained when I did not add the "End User Mode" to POTO so I skipped it here as well. The screen shots below show everyone's favorite Night Glow mode. @TerryRed has suggested several times that I lower the gamma in postprocessing. I finally decided to try it. I was surprised that I ended up lowering it the most on the Day mode and setting it only slightly lower than the default on the Night Glow mode.

I would like to make the texture on the bumper look better but the only control I can adjust the light is with the color option. I discovered that a bumper can be coded just like a light bulb in the script but the only options are on, off, blink and FlashForMs. I asked @ravarcade if he could set up bumpers so we can use the same brightness and glow controls in the script as with other lights. He said he would look at it. I tried adding different types of lights to the center of the bumper but didn't like the way it looked.

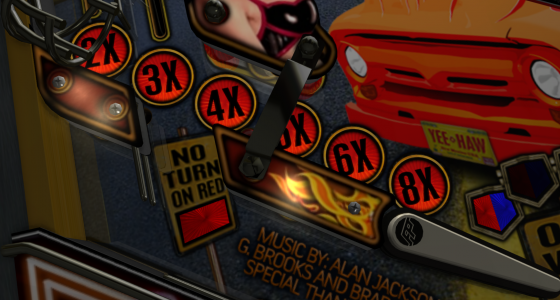
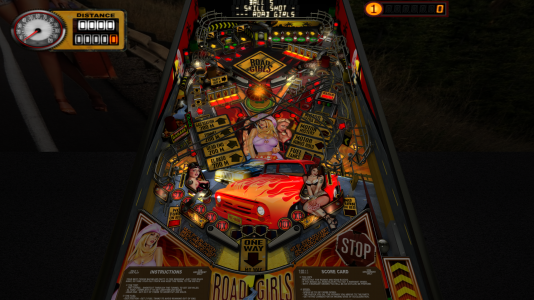
Blindmankind did not hide the halos for the light insets on the playfield under the apron like most table authors do. So I added BAM coding to set the glow radius in the script. I struggled with this quite a bit. When you set the glow radius to less than 20, the inserts look odd with just a small area of white at the center of the bulb where the halo is located. When you set the glow radius to 20 or higher, there is a lot of white added. In fact, the center of the light looks pure white. I almost decided to set the glow radius to 0 and call it done. Then I discovered the glow looks the way I want when I set the glow radius to 40 and then reduce the glow brightness to 0.4. The effect is a bit subtle but most obvious on the 2x to 10 bonus multiplier lights in the screen shot below. Some of the end users may want the glow to be more obvious than this so I added constants at the beginning of the script where both parameters can be changed.

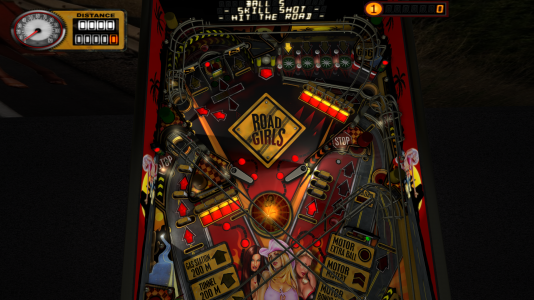
Anyway these are the screen shots. I did add shadow maps to the lights under the right slingshot but they did not show up very well because the red of the truck is so bright already. So I don't think I can do much about it. The upper playfield texture is almost black but I did figure out a way of adding shadow maps to it which you can see in the second screen shot.
```Road Girls V1.0  (DOFLinx MX).png

```Road Girls V1.0  (DOFLinx MX)2.png
 
I am trying to fade in/out a flasher, is this suppose to turn it off?
Flasher1Ext.Brightness=0
Flasher1Ext.GlowRadius = 0
Flasher1Ext.GlowBrightness = 0

I don't see anything happening on the table

I tried setting up a flasher that way. I found it gets quite dark but it is not totally turned off (at least when I set the color to white). There is a small amount of glow that remains. You might try using your code to get it dark and then in the next step add this code:

Flasher1.State = BulbOFF

Maybe try setting the color to RBG 0, 0, 0
 
@polygame

I tried these 4 lines of code and it made the flasher as dark as I think it can go.

Flasher1Ext.Brightness=0
Flasher1Ext.GlowRadius = 0
Flasher1Ext.GlowBrightness = 0
Flasher1Ext.SetLitColor 0, 0, 0

Then I tried just using this one line of code and it looked the same:

Flasher1Ext.SetLitColor 0, 0, 0

George
 
Last edited:
Looking good!

Yah.... i never even thought about the possibility of using the brightness,etc settings for the "plastics" textures...but that is a good way to also accommodate for darker global lighting while also giving the illusion that the plastics are "lit up". This can be adjusted for G.I On and Off to match and look correctly as needed. Especially when turning down Post Processing.

Many people would change the "colour" of textures or the surfaces on a table to a grey or darker colour to make them seem darker as needed (SLAM does a lot)... but instead changing the brightness,etc in script is actually a good idea, since it can be changed on the fly... and now with rav's new feature to change the Attenuation of Lighting per light... there are even MORE options to use. :)
 
@TerryRed

It is a bit of a juggling act. I ended up adding the texture lighting to many objects, even drop targets and spinners. Then the playfield and plastics looked too dark so I increased the brightness of them also but only by 0.2. You can't set the values to be negative so you have to change the ambient lighting if you want to go darker.

I dislike adding black or using the burn option on playfield textures. I never do it. I have noticed that some folks go extremely dark but I like to be able to see everything. Maybe my poor eyesight has something to do with it. BAM will allow extremely dark settings but I don't go there. To my thinking, the VP table "Stranger Things" is too dark but it is an excellent table otherwise.

George
 
A big part of it is because of how tables were designed to get around FP's limitations before BAM. With VP they are still doing that on many tables.

Yes, some like to add in darkened parts of tables or shadows. This is still prevalent in many VP tables... and on some older FP tables. Luckily I was able to get a "no shadow" updated pf image from the VP table author for F-14 (which he redrew and is 4K and looks much nicer).

Yah, trying to brighten "no light" objects can make for tricky business. For things like plastics...sure it makes sense and isn't affect by the rest of the lighting in the wrong way...as long as you adjust everything correctly for when the GI is on and off. For SLAM's tables, he usually has a "plastics on" and "plastics off" which is used for GI on and off. (F-14 had these reversed which really screwed me up).

Many other FP tables don't have this though as they were designed with the global lighting,etc to never change.

I'm of the mindset today that I want the table's real lighting (flashers for gi) to handle as much of the table's illumination as possible. Then change the plastics to accommodate and match. Then have the inserts and flashers adjusted to match what you want to see. Then, if needed adjust other textures,etc...but be sure to do so for GI on and GI off. It's why I'm not big on using a single "all brightness" command for all the lighting.
 
"I don't know much about art but I know what I like"(TM) Monty Python

Whatever you guys are doing is impressive nonetheless.

I agree on being able to see as much as possible avoid looking at just lights flashing Blending it all is better for my eyes especially with whites! And let's be honest, pinball tables art is worth to look at :)
 
@TerryRed I used to do it that way but then started adding the texture lighting stuff in the script. ...So now I adjust the nanoflashers after I do that and after adding shadow maps. Shadow maps tend to add a lot of light also.
 
"I don't know much about art but I know what I like"(TM) Monty Python

Whatever you guys are doing is impressive nonetheless.

I agree on being able to see as much as possible avoid looking at just lights flashing Blending it all is better for my eyes especially with whites! And let's be honest, pinball tables art is worth to look at :)

Thanks, I actually studied art in college so I tend to be nit picky about lighting. I am glad to hear someone agrees with us that the black painted stuff is not the way to go.
 
@TerryRed I used to do it that way but then started adding the texture lighting stuff in the script. ...So now I adjust the nanoflashers after I do that and after adding shadow maps. Shadow maps tend to add a lot of light also.

Shadowmaps actually don't add any light at all. They just add "white" brightness to the areas they project on (like what you do with the textures). Sometimes tha can actually cause a problem if the GI or other lighting changes colour (like in Aliens).... so sometimes you need to balance or turn off shadowmaps during certain table events. I remember using a separate set of G.I bulbs in Retroflair BAM to separate them so the shadowmaps were also more visible for a similar reason.

This is also another reason using darker (I would argue normal level) Post Processing helps....because the Shadowmaps are much more visible without the need for as much white light used and also still using flashers for gi.
 
Well guys I thought I might replace the autoplunger with a standard plunger but it would be more work than I think it is worth. The autoplunger works well and all that is needed is to get the ball to the flipper so you can hit the lane with the flashing lights to make the skill shot. I tried a basic set up with it and it didn't seem like it is needed.

I have added several options that require pressing different letter keys to make things happen like the lighting requires pressing the "L" key. I know that the pinball cabinet guys have a limited number of keys available so I thought I might add a menu to reduce the number of different keys. Blindmankind had already set up the Special 1 and Special 2 keys to change the music so I decided to not use those. Popotte has given me permission to use his menu system. ...So I will attempt to figure out how to set it up on this table.
 
AnonTet has reviewed the table and I have incorporated his comments. Thank you AnonTet! If anyone else wants to review and comment on it, I am willing to send it to you. I changed objective number 7 for the plunger replacement of my list on the first posting in this thread to the menu system I discussed above.

There are only 2 objectives left -- the menu system and the rock music version. I think it plays quite well now.
Let me know if you want any animated models....
 
Forum activity
Help Users
You can interact with the ChatGPT Bot in any Chat Room and there is a dedicated room. The command is /ai followed by a space and then your ? or inquiry.
ie: /ai What is a EM Pinball Machine?
  • No one is chatting at the moment.
      Mibs Mibs: StevOz has posted a new reply in the thread "(mis)Adventures in Cooking".
      Back
      Top