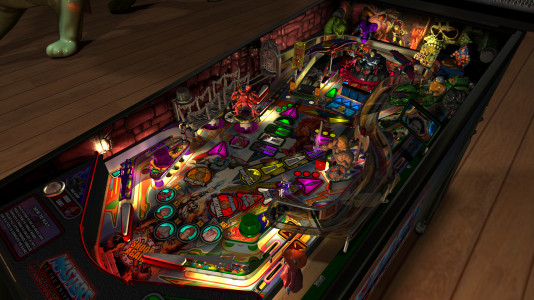
WIP Original Table BAM FizX FP Masters of the Universe - Collector's Edition

Future Pinball
I give credit to many VP guys who do this (to work around VP's lighting limitations) on all their tables. Those guys are experts at it, so seeing their examples... and getting a bit of advice / help on occasion helps immensely.

It's not simple stuff... even for those of us who do understand how it all works.
So, good new, VP and FP men (or women) can work together. Is the war over?
Otherwise, nice work Terry!
 
So, good new, VP and FP men (or women) can work together. Is the war over?
Otherwise, nice work Terry!

There are always some (on both sides) that want it to be that way, sadly.

It doesn't matter what tool / editor / player we use. It's the end result that matters, and who enjoys playing it, and who enjoys creating it. Helping someone create a better table on VP or FP is a benefit for "everyone".

I've created on VP and FP... and I help people with VP stuff all the time... and there are VP guys who are happy to help me when possible. Everyone wins that way, and we all get to play better pinball games.
 
I totally agree with you. Before FP, I helped some guys (script) on VP. Afterwards, I gave consent to quite a few people so that they could use my pics in order to do a VP version of my FP version.
For me, it was never war, but for some, unfortunately, it was.
 
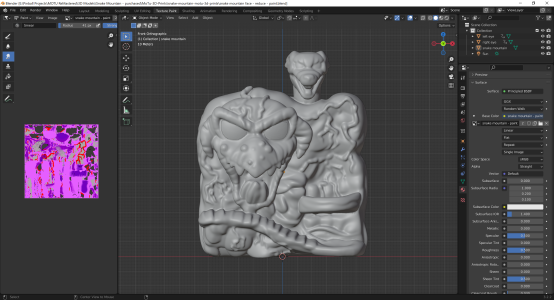
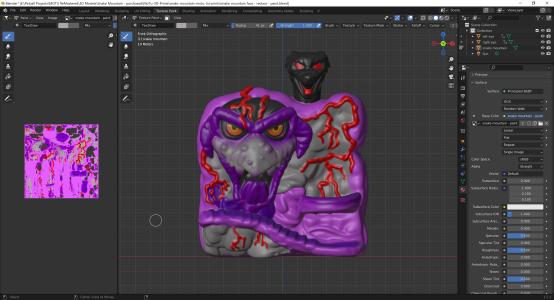
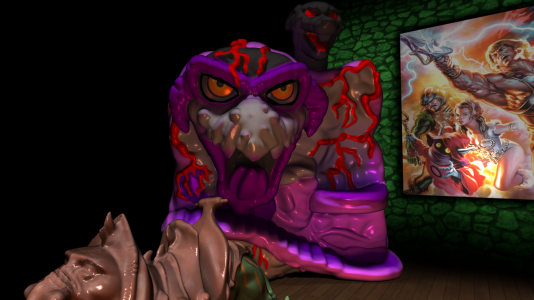
Snake Mountain... painted, textured, and baked!

This model was a high detailed model, meant for 3D printing with no textures. I had nothing to go by except for pics of the older toys... so I tried my hand a 3D model painting. Kind of neat, but Blender had only two tools. Paintbrush and Smear... so it was hard to get something super detailed. But that's ok, as when I baked the model with shadows, that helps to make up for it.

This first pic is the model as it was, with no paint / textures, and after I reduced it from 3 million + polys down to about 120,000.

1703568068680.png


Second pic is after painting and adding the eye texture using shrink wrap.

1703568081096.png


Third pic is after baking in some lighting and shadows. This is now in-game.

Looks MUCH better now.


1703568148022.png
 
Not sure what your method for reducing poly count in Blender, but I found this tutorial to be very helpful -

 
Not sure what your method for reducing poly count in Blender, but I found this tutorial to be very helpful -


Yes, I've used that for some models already (He-Man, Skeletor, Battle Cat, Stridor, etc).
 
Just jaw-dropping amazing work Terry. :surprise:
 
I've been busy.

I've added more models and toys to MOTU CE, and have completely updated most visuals and the textures to use pre-baked lighting and shadows (for the main lighting, G.I. and spotlights).

Snake Mountain Snake

I added a new Snake Mountain snake model. This was from the Snake Mountain 3d scanned model, so I had to convert this down to more optimized numbers of polygons. I also had to manually paint the snake like I did for Snake Mountain, since it didn't have any textures created for it. I tried to make it look similar to the classic 80's toy I grew up with. Turned out great.
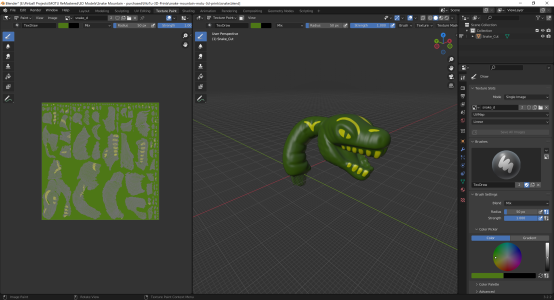
1704935338107.png


The snake is positioned on the top left ramp. When a ball rolls through the entire ramp, the snake will rotate to follow the ball as it passes by, then returns to its default position when the ball exits the ramp.
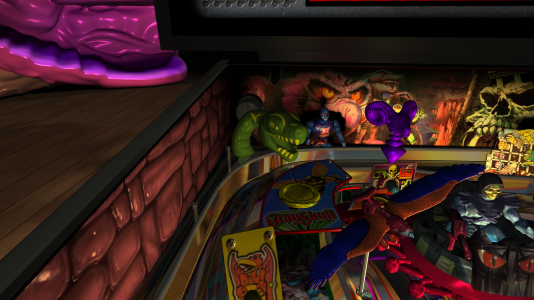
Masters of the Universe - Collector's Edition (PinEvent V2, FizX - 1.0) - snake.png


Snake Mountain doorway and door

I really wanted to add more to the table for Snake Mountain visuals. The left side of the table is geared towards Snake Mountain, while the right side is geared towards Castle Grayskull.

So I purchased a 3d model of the classic Snake Mountain toy's doorway and its wolf head door. This was a tricky one to convert and remodel. I also prebaked new textures for both the doorway and the door to make it look so much nicer with shadows.

The doorway is placed at the halfway point of the ripper ramp, which now converts to a different type of ramp at the doorway.
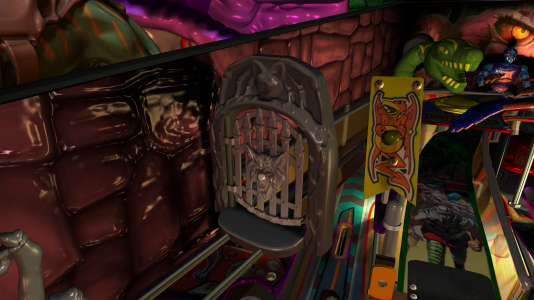
Masters of the Universe - Collector's Edition (PinEvent V2, FizX - 1.0) - doorway.png


Snake Mountain bridge

I really wanted to add the bridge from the Snake Mountain toy to the table.

I wasn't sure where I could use it. Then it clicked. Why not convert the ripper ramp's second half to the bridge and combine that with the snake, and doorway to act as a complete "escape from Snake Mountain" type of ramp.

So I purchased a detailed model of the classic 80's toy bridge. I had to remodel this in a way so it would follow the shape of the invisible wireramp while reducing the polygons. I also prebaked new textures to add shadows that really add a nicer depth to the look of the model on the table.
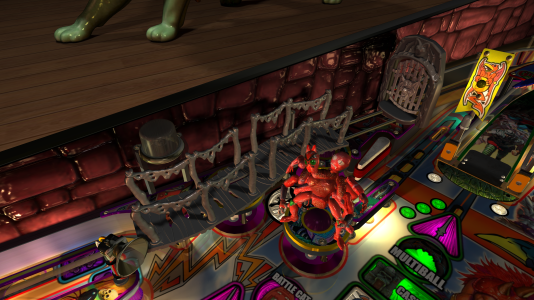
Masters of the Universe - Collector's Edition (PinEvent V2, FizX - 1.0) - bridge and door.png


How it works.

When the ball goes through the ripper ramp, it will roll towards the snake which will rotate to look at the ball. When the ball passes the snake, it rotates to follow the ball rolling down the ramp towards the door. When the ball hits the door it smashes it open. The door uses BAM's miniplayfield easing feature (set to bounce) to easily animate the door to have a cool bounce effect when it opens and hits its max rotation.

Then the ball passes through the doorway and transfers to a short wireramp which then becomes the bridge. The bridge will "glow" to the same colour as what the neon light on the ramp is showing. This cool effect uses BAM's custom model RIM feature.

When the ball rolls off the bridge to the left inner lane, the bridge glow turns off, the door will close (with a bounce effect), and the snake returns to default position.
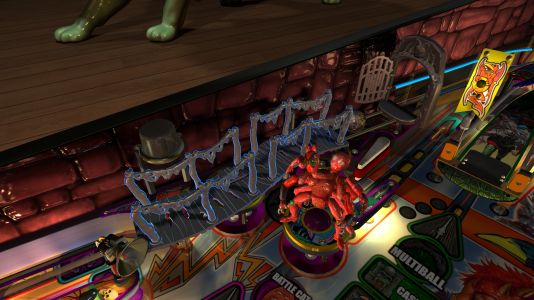
Masters of the Universe - Collector's Edition (PinEvent V2, FizX - 1.0) - bridge glow.png


Video demo of the Snake Mountain ramp toys:


View attachment sm ramp.mp4


Blender and prebaking textures for lighting and shadows.

I've spent a lot of time with Blender to learn how to do some prebaking of some lighting and shadows of the table and most items. This completely elevates the visuals of the table. The results... especially during gameplay and in VR, looks awesome.

This requires the table to be completely imported into Blender, rebuilt, and have all default textures applied. I had to recreate all the table's G.I. and spotlights.

Future Pinball has realtime dynamic lighting that looks amazing, but those lights can't recreate shadows for all the items on the tables. We can use BAM shadowmaps for every light, but that only applies to the playfield surface.

By prebaking textures for many table items in Blender with G.I. on and G.I. off conditions, you can create a much more realistic look to the table. The lighting and shadows applied across all items can really make a big difference in how the table looks and the depth effect it gives.

I have to click on each table item in Blender, then have Blender "bake" the item with the lighting conditions I have set. Then I save those rendered images and import them into FP. I have to do this process for each item one at a time. In most cases I do this with G.I. lights off (just the main / sun light is used)... and also do this with the G.I lights on.

Blender does this using ray tracing, so you can have all aspects of lighting, reflection, emission from all items on the table have an effect of the rendered texture. I find that I don't like to use a "full reflection" rendered look, as that only looks good from one camera view. (the ray traced reflected illusion loses it's effect once your camera view changes or if you play in VR).

Then I change the table's code to change all textures on the table for G.I. on and G.I. off and other lighting conditions such as spotlights being turned on / off. I didn't go crazy to do this for "everything", as FP's dynamic lighting combined with the prebaked textures I do use, makes for a fantastic combination when used correctly together. this work really well with FP's moving camera views, and looks stunning in VR!
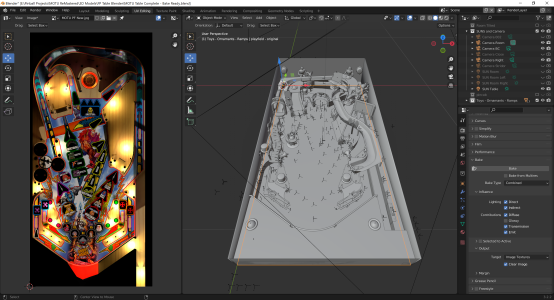
1704943602538.png


The Combined Result!

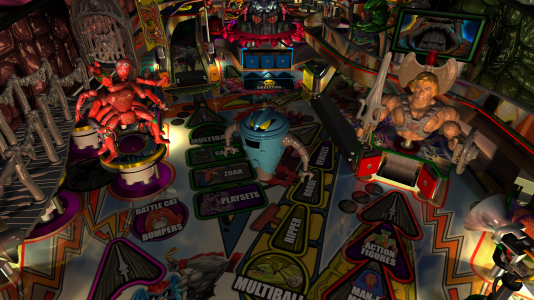
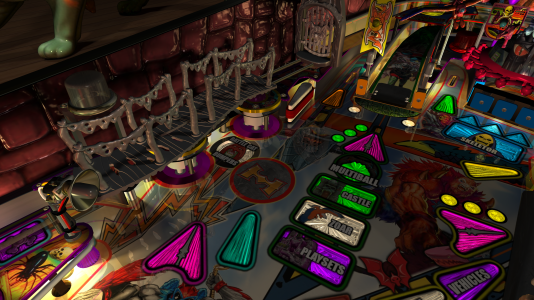
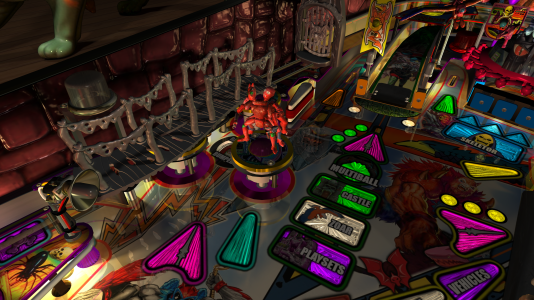
Here is how the table looks with the prebaked textures in-game! I LOVE how this turned out. When you compare it to the table with the original textures, it really stands out. The direct and indirect ray traced lighting / shadows on the playfield, backwalls, sidewalls, ramps, plastics, metal guides, etc really works nicely in all views.

When I play this in VR, it looks like a real table is in front of me, and the toys look like the real toys from my childhood. Now I'm going to want to do this for other tables now! (this was always the plan for Silent Hill).
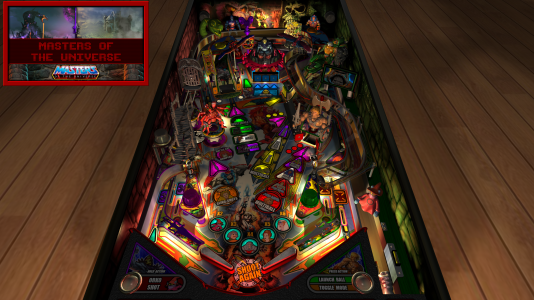
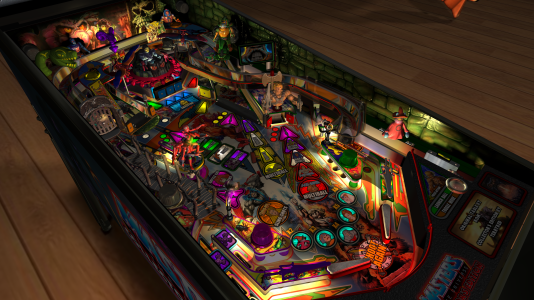
Masters of the Universe - Collector's Edition (PinEvent V2, FizX - 1.0) - baked.png

Masters of the Universe - Collector's Edition (PinEvent V2, FizX - 1.0) - baked left.png

Masters of the Universe - Collector's Edition (PinEvent V2, FizX - 1.0) - baked right.png


Now that I'm at this point, I need to focus on getting some of the Man-E Modes done.
 
Last edited:
Looks great! Will this table take 5+ minutes to load? LOL
 
Looks great! Will this table take 5+ minutes to load? LOL

No tables take that long for me to load on my PCs, except on my old PCs. (but not 5 mins still) :)

Only tables with 3000+ textures for videos (anything SLAMT1LT updated, or the older MOTU Mastered table) will take that long to load on an older PC. Even if they did take long to load... 5 mins is much faster than 5 months of time it can take to make tables like this.

This table so far loads much faster than any of those tables.
 
Last edited:
New mode: Orko's Outta Here!

So far, the current main modes I have for MOTU CE are:

4 multiball modes (He-Man, Ripper, Castle, Skeletor), She-Ra Sling Shots, Sorceress Struggles, Hordak is Horrible, collecting all the action figures / vehicles / playsets.... and you can also use "Orko Shots" to have Orko use his magic to make a shot for you.

MAN-E Modes

Man-E Modes are multiple additional modes you can play when you enter the He-Man kicker (and Man-E Modes is enabled). The first of those modes is:

Orko is Outta Here!

In this mode, Orko is up to his bad magic tricks, and pisses of Man at Arms. Orko is scared off his fury, so he tries to fly away to hide. Your job is to find him, by hitting whichever shot makes its way to where Orko has flown to (no blinky lights to help you). You only have 60 secs to complete all the shots to catch Orko. If you catch him, you complete the mode and collect the Orko action figure.

When the mode ends, Orko magically transports back to his normal spot by the plunger.

More Man-E Modes are coming!

View attachment orko outta here demo.mp4
 
Last edited:
I was the world's biggest He-Man kid in like 1983-84 timeframe.

So long as we can get a Cringe'or turning into Battle-Cat mode. . . I am absolutely 'here for it' :D
 
The pre-baked blender lighting you are incorporating is taking FP/BAM to the next level! Can't wait to employ these techniques on my next table...
 
ROBOT ROUNDUP (New Man-E Mode)

Now that I'm back to work on MOTU CE, I've been able to finish creating another Man-E Mode. This one is called Robot Roundup.

The objective is to destroy Skeletor's Hover Robots that have taken over the Palace. If you hit the robots they repel your attack. Distract them with a shot to one of the ramps. Then the robot will "detect an intruder", turn their back to you, and glow red. They won't be distracted for long. Now when you hit the robot it will be destroyed. Destroy 4 robots to clear the mode.

This video demo shows you how to complete the mode, while also using some Orko Shots to help you out!

More Man-E Modes are coming!

(video is 3 minutes long and in 4K, so be patient. If you can't view it, you can click in the options for the video and download it directly to view it)

View attachment robot roundup demo.mp4
 
New TOY - Bumperhead!

=================================

I've been trying to figure out a way to add some new modes and a toy to MOTU CE. After hearing AstroNasty pester me enough times to remove the 3rd bumper (he was right, as it blocked the left orbit shot)... I thought... why not combine both. The result... a new combo multipurpose toy called... Bumperhead!

BUMPER

Now by default for the main mode, the 3rd bumper will hide inside the cabinet, with a trap door in its place. This opens the table up and allows for much better flow and new shots for the left orbit. When a mode needs to use the 3rd bumper, the trap door moves out of the way and the bumper rises up. When the shots / jackpots for the bumper are completed (or the mode ends) then the bumper hides away again.

bumperhead - no bumper.png

bumperhead - bumper.png


BUMPERHEAD - New Toy!

I also wanted to have a new toy that would rise out of the playfield, but this would have restricted its size if it matched the bumper radius. So I figured, why not create a cool new portal effect that would transport any toy I wanted there! It looks real neat as it rises and lowers to reveal the new toy, while using dynamic lighting and animation that moves with the effect.

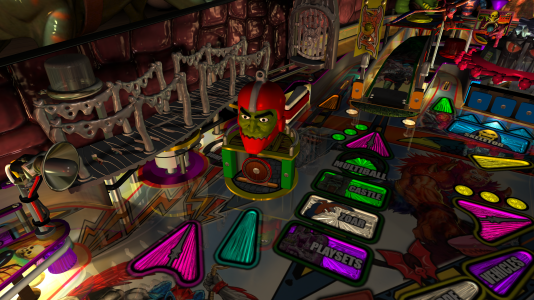
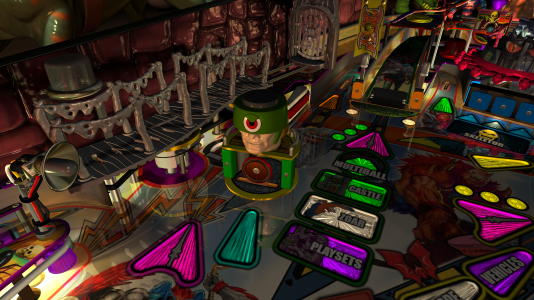
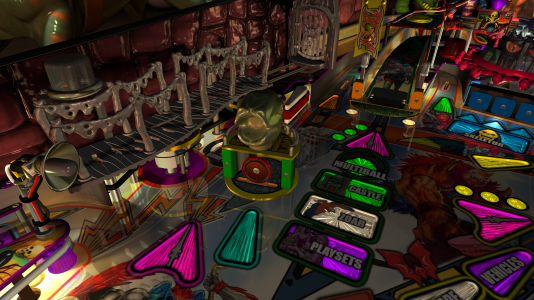
The Bumperhead toy will feature different enemy "heads" that change up based on the mode. It has two standup targets that, if hit, will cause the entire toy to rotate in either direction based on which target is hit. It also has a center drop target that can block the ball and trap the ball (when the ball enters the toy). This can allow the enemy to capture the ball, rotate in any direction, and fire the ball wherever I want!

This entire combination makes for a toy that can be used in many creative ways!

This is an example of something that is not easy to make work normally, but with FP-BAM's mini playfield tool and dynamic physics... its actually very easy to do. No wizardry and tricks needed. It just works as you would expect it to.

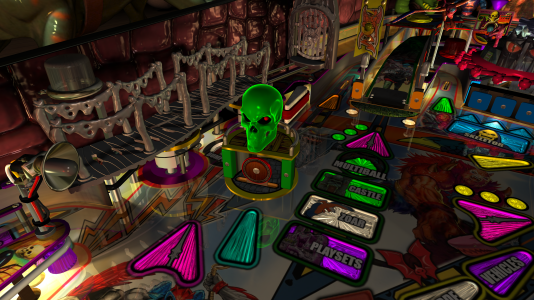
Each head (except for Kobra Khan) was a 3d scan with no textures, that required a lot of conversion, and I also had to paint new textures. I had to make a new Tri-Clops visor model and create new "eyes" for him as none of the examples I could find looked good.


bumperhead - portal.png

bumperhead - scare glow.png

bumperhead - trapjaw.png

bumperhead - triclops.png

bumperhead - kobra khan.png

=================

Here's a video preview that shows how this works.


View attachment bumperhead demo.mp4
 
Glowing Getaway (SCARE GLOW)

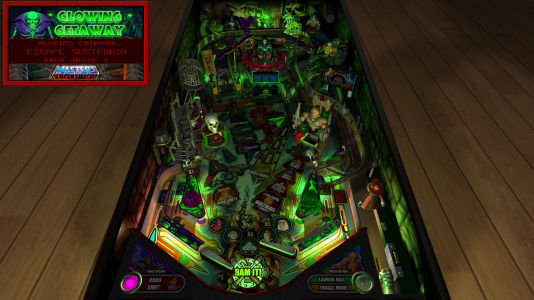
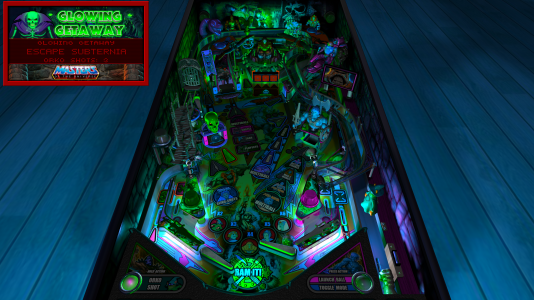
Here is a my newly completed Man-E Mode. "Glowing Getaway", featuring Scare Glow.

You are trapped in Subternia, which is ruled by Scare Glow (voiced by Candyman himself, Tony Todd). You need to escape!

This mode uses my new Bumperhead toy, which teleports into the playfield when the mode starts. It has Scare Glow's head on top, with two targets, a drop target, and a capture area inside.

If you hit the side targets, it makes the toy rotate, which dynamically changes the shot. If you hit the drop target it opens up the capture area inside.

motu ce - sg - subternia.png


CAPTURE AND ATTACK

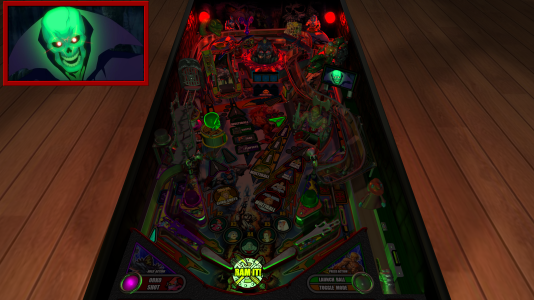
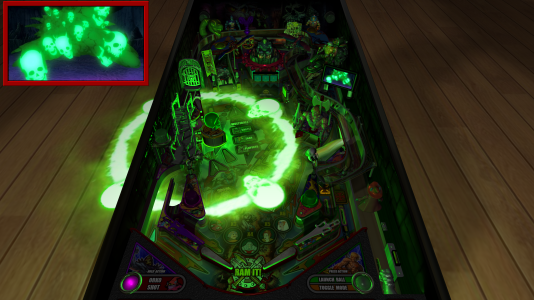
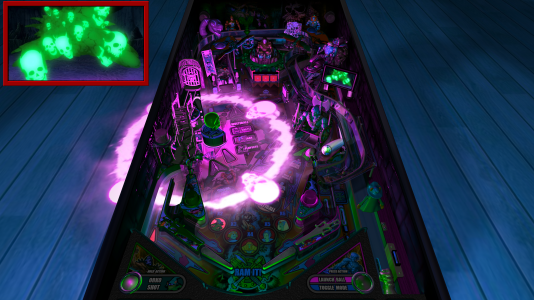
During the first phase of the mode, you need to hit the ramp shots, and eventually He-Man to progress. However, if you hit the capture area inside the Bumperhead, then Scare Glow will capture your ball, he'll glow green, taunt you, then he'll rotate and shoot your ball into a random location that is not a progression shot! He repels your ball with a cool animated green glowing blast effect with skulls!

If you hit the upper left loop shot, then when the ball rolls down toward Scare Glow, he will sense you, turn around quickly to capture the ball, and taunt you again!

motu ce - sg - subternia - ball captured.png

motu ce - sg - subternia - attack.png


SUBTERNIA - GLOW

When you progress far enough, Scare Glow will get angry, transform and threaten to make you part of his Collection!

motu ce - sg - subternia - change.png

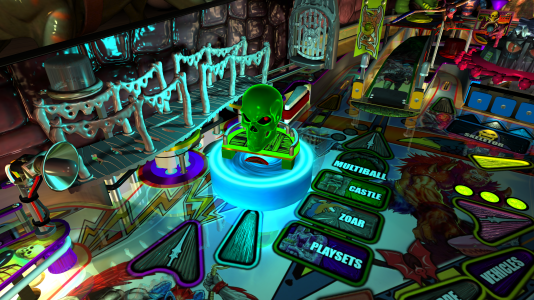
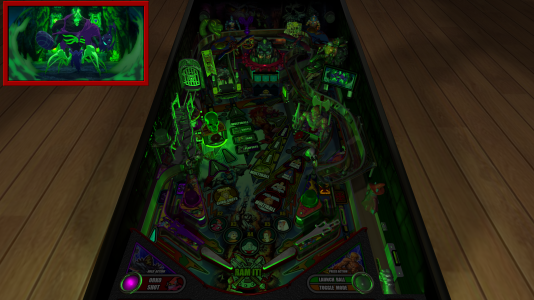
The game will change to a glow in the dark look, and the music ramps up! This is phase 2 of the mode.

Now you must hit Scare Glow himself! (in the capture area of the Bumperhead) It can be tricky to hit the shot due the how the Bumperhead can rotate with each hit to the targets. Scare Glow will capture your ball and fire it away (while making threats about what he will do to you). Each time you do this now however, you progress more.

Eventually the last shot will be at He-Man. When you hit it, you'll escape! Then you'll see the Bumperhead metal cover (that contains items within the playfield) fall from the sky and smash down on Scare Glow, trapping him in Subternia!

If you do this, you have completed the mode, and are awarded the Scare Glow action figure!
I love how this turned out!

motu ce - sg - subternia - glow.png

motu ce - sg - subternia - glow - attack.png


VIDEO DEMO

Here is a complete playthrough video of the entire mode. It looks way cooler when you see it in action!


View attachment MOTU CE - ScareGlow Demo_HD.mp4


More Man-E modes are coming!
 
Glowing Getaway (SCARE GLOW)

Here is a my newly completed Man-E Mode. "Glowing Getaway", featuring Scare Glow.

You are trapped in Subternia, which is ruled by Scare Glow (voiced by Candyman himself, Tony Todd). You need to escape!

This mode uses my new Bumperhead toy, which teleports into the playfield when the mode starts. It has Scare Glow's head on top, with two targets, a drop target, and a capture area inside.

If you hit the side targets, it makes the toy rotate, which dynamically changes the shot. If you hit the drop target it opens up the capture area inside.

View attachment 41783


CAPTURE AND ATTACK

During the first phase of the mode, you need to hit the ramp shots, and eventually He-Man to progress. However, if you hit the capture area inside the Bumperhead, then Scare Glow will capture your ball, he'll glow green, taunt you, then he'll rotate and shoot your ball into a random location that is not a progression shot! He repels your ball with a cool animated green glowing blast effect with skulls!

If you hit the upper left loop shot, then when the ball rolls down toward Scare Glow, he will sense you, turn around quickly to capture the ball, and taunt you again!

View attachment 41784

View attachment 41785


SUBTERNIA - GLOW

When you progress far enough, Scare Glow will get angry, transform and threaten to make you part of his Collection!

View attachment 41786

The game will change to a glow in the dark look, and the music ramps up! This is phase 2 of the mode.

Now you must hit Scare Glow himself! (in the capture area of the Bumperhead) It can be tricky to hit the shot due the how the Bumperhead can rotate with each hit to the targets. Scare Glow will capture your ball and fire it away (while making threats about what he will do to you). Each time you do this now however, you progress more.

Eventually the last shot will be at He-Man. When you hit it, you'll escape! Then you'll see the Bumperhead metal cover (that contains items within the playfield) fall from the sky and smash down on Scare Glow, trapping him in Subternia!

If you do this, you have completed the mode, and are awarded the Scare Glow action figure!
I love how this turned out!

View attachment 41787

View attachment 41788


VIDEO DEMO

Here is a complete playthrough video of the entire mode. It looks way cooler when you see it in action!


View attachment 41789


More Man-E modes are coming!
Awesome work! You always out-do yourself
Are the glow and table transition all pup pack video and texture swapping?
I need to start messing around with pup....
 
Awesome work! You always out-do yourself
Are the glow and table transition all pup pack video and texture swapping?
I need to start messing around with pup....

There is no PuP on this table at all so far. This is all native FP stuff.
 
damn, hologram?

If you mean the glowing green animated blast and skulls effect, its an overlay with all textures brightened, and the overlay being scaled to a larger size over time using a mini playfield... and flashers, etc

(a hologram renders through everything, overlay does not)
 
If you mean the glowing green animated blast and skulls effect, its an overlay with all textures brightened, and the overlay being scaled to a larger size over time using a mini playfield... and flashers, etc

(a hologram renders through everything, overlay does not)
how do you even think of that. damn thats great. I guess doing this for what 20 years youi lears to intertwine what you have to make something almost impossible happen.
 
I'm eagerly awaiting one more toy...the completed table itself! Any ETA?
 
I'm eagerly awaiting one more toy...the completed table itself! Any ETA?
This isnt Terrys Mod? Or are you guys teaming up?
anyone do 3d modeling that will do a model or 2 for a future table if I get people on board?
 
This isnt Terrys Mod? Or are you guys teaming up?
anyone do 3d modeling that will do a model or 2 for a future table if I get people on board?

He was just joking... as in he's waiting for the table when it comes out. This is my work alone from start to finish.

No ETA except... when it's done.
 
General chit-chat
Help Users
You can interact with the ChatGPT Bot in any Chat Room and there is a dedicated room. The command is /ai followed by a space and then your ? or inquiry.
ie: /ai What is a EM Pinball Machine?
  • No one is chatting at the moment.
      B @ BrocPlaysPin: watching a twitch pinball FX stream rn
      Back
      Top