Twilight Zone

I am really tired of how long this table takes to load
I said it too a couple of times .... could you replace the various videos (made with the overlay or hologram method) with gif method ?!!
you would drastically reduce the loading time.....but it must also be said that each gif could increase by MB ... for example I made the gif of "Batman - Some days you just can-t get rid of a bomb" and it became 31 MB ... against the 6.80 MB, of the video.......

the video lasts 2 minutes and 30 seconds, and the gif is 600 frames
I have been reading about the gif method though I haven't tried it yet. My understanding is that gifs don't perform any better than using Slamt1lt's method of loading individual frames. Is this wrong?
 
The only benefit from using GIF is to reduce "load" times, and not needing to use multiple jpg files for a video.

Otherwise, GIFs are only 256 colours (compared to 16 million for jpg), file sizes are much larger, and they have shown to possibly cause performance lag / stutter issues depending on how they are used / resolution / fps, etc.
From what I have read, gifs work best for short sequences on table objects. I have never been interested in doing that all that much. They might be useful to create the signs on Blade Runner that have repeating sequences like you see in the movie.
 
From what I have read, gifs work best for short sequences on table objects. I have never been interested in doing that all that much. They might be useful to create the signs on Blade Runner that have repeating sequences like you see in the movie.

Honestly... the only benefit to using GIFs, is the easiness of using a single file compared to creating / importing multiple jpgs (which is not hard).

I've used GIFs, Overlays, Holograms, and my own new method using the pup plug-in for animated 24 bit images. If all you want is simple videos... then the standard methods used with Overlays and Image Sequence is still the best option for performance and quality.

If you want animations of anything else.... my pup plug-in method gets the best visual quality and performance by far. Yes, it need a bit more coding... but for the most part its copy / paste and change the variables as needed. Only a few minutes at most to add an animation for the code (much faster once you know what you are doing).

Here the basic low-down:

=============

GIFs

Pros:
- single file for an animation
- fairly simple commands
- can be used on anything in FP (swaps textures directly)

Cons
- 256 colours
- very large file size
- performance is the worst of all methods
- may cause stutter / lag issues

=============

Overlays / HUDs / Holograms

Pros:
- integrated FP support
- can use Image Sequences directly
- easy to use commands
- can use any combo of image formats and textures
- great for "video screens"
- fully lit, not affected by light (holograms and HUD only)

Cons:
- must use multiple images for animations
- holograms can't be blocked by anything, as they render overtop of everything
- only usable for basic videos
- can't be used with any object / surface

==============

PuP Plug-in texture animations (TerryRed method)

Pros:
- 24 bit texture animations (16 million colours)
- file sizes are small (jpgs) compared to GIF
- can be used on anything in FP (swaps textures directly)
- excellent performance
- can use much higher resolutions with better performance compared to GIF

Cons:
- must use multiple images for animations
- images must be added to "any" image list (if not already used on another surfaces / object)
- must use a timer and custom code to create the animations
 
I have been reading about the gif method though I haven't tried it yet. My understanding is that gifs don't perform any better than using Slamt1lt's method of loading individual frames. Is this wrong?
what do you mean by individual frame? the gif, in individual frame, would not make sense.
but,for slam tables, this would be a great solution,IMO.

now I don't understand very well, the comparison that Terry explains, that is this .... GIFs are only 256 colors (against 16 million per jpg) ..... now, it is clear that any transformation, or modification of something, it involves some loss of quality ..... but as Terry explains, it seems that the difference is colossal?!!
having said that, the transformation from video to gif, it's not very good, I noticed it too, I tried many sites, all have a limitation they lose frames ..... and also quality, I think there is a suitable program for this job, but surely it is to paid .... so the best I have used remains this here
but in my opinion I prefer a lower quality video than the hours of waiting to open a table.

now I don't know what's inside in this table how is, if it has video or not, but if it takes a long time to open, I think so .... I don't think they are only individual frame.
 
Last edited:
This table uses many models that ROM built that I am sure require a great deal of memory. The robot uses more than 3000 "tris" that I think stand for triangles. I don't know to what extent converting all the textures to power of 2 will improve table loading but I think it will help at least some.
 
Honestly... the only benefit to using GIFs, is the easiness of using a single file compared to creating / importing multiple jpgs (which is not hard).

I've used GIFs, Overlays, Holograms, and my own new method using the pup plug-in for animated 24 bit images. If all you want is simple videos... then the standard methods used with Overlays and Image Sequence is still the best option for performance and quality.

If you want animations of anything else.... my pup plug-in method gets the best visual quality and performance by far. Yes, it need a bit more coding... but for the most part its copy / paste and change the variables as needed. Only a few minutes at most to add an animation for the code (much faster once you know what you are doing).

Here the basic low-down:

=============

GIFs

Pros:
- single file for an animation
- fairly simple commands
- can be used on anything in FP (swaps textures directly)

Cons
- 256 colours
- very large file size
- performance is the worst of all methods
- may cause stutter / lag issues

=============

Overlays / HUDs / Holograms

Pros:
- integrated FP support
- can use Image Sequences directly
- easy to use commands
- can use any combo of image formats and textures
- great for "video screens"
- fully lit, not affected by light (holograms and HUD only)

Cons:
- must use multiple images for animations
- holograms can't be blocked by anything, as they render overtop of everything
- only usable for basic videos
- can't be used with any object / surface

==============

PuP Plug-in texture animations (TerryRed method)

Pros:
- 24 bit texture animations (16 million colours)
- file sizes are small (jpgs) compared to GIF
- can be used on anything in FP (swaps textures directly)
- excellent performance
- can use much higher resolutions with better performance compared to GIF

Cons:
- must use multiple images for animations
- images must be added to "any" image list (if not already used on another surfaces / object)
- must use a timer and custom code to create the animations
The other con for PUP is if you have hundreds of images we don't have shortcut code yet.
This would be ideal then we can ignore the traditional FP method altogether.
 
@Gimli

Understand... when it comes to creating "videos" or animations with FP... you will always be dealing with images converted to textures used in "ram", as opposed to playing a stream like a typical video player does.

The GIF method is basically extracting the frames to images / textures in realtime... but the reality of that for many many videos is very limited for ram usage, and performance.

Or otherwords... it doesn't matter what method you use.... if you want quality / performance for videos and animations you will always be dealing with many images in FP.

So any shortcuts/commands for the pup plug-in would surely be great and welcome.... but for simple "videos" like what SLAM uses.... you are still better off using an Image Sequence / Overlay / jpgs in most cases.
 
@Gimli
So any shortcuts/commands for the pup plug-in would surely be great and welcome.... but for simple "videos" like what SLAM uses.... you are still better off using an Image Sequence / Overlay / jpgs in most cases.
I suppose you are right.

with Billiards I have used Gifs as each of the 10 gifs has > 100 frames.

Gif coding was so much easier than FP Method and PUP coding doesn't currently easily permit handling large frame counts.

If there were short cut codes for the pup method then it would be useful to understand and compare the differences between the Traditional FP "Image sequence/overlay/jpgs" Vs the TerryRed "image sequence/pup on any other FP surface/jpgs"

Which allows better resolution, quicker loading time etc...I suspect they are both the same ?
But who knows ? I am not sure what PUP implies in terms of fpRam vs GPU/System RAM etc...

I suppose as you are loading the images into Image Sequencer regardless in both instance, you can use either method as needed.

Can you put pups on overlays too ? Because if so we could have a unifying method that works across the board . Which it will make it easier for people to learn.

I guess the ultimate will be if and when we can cue a video player with sound to project a video file onto the FP table
 
I found some beautiful graphics to add to the insides of the cabinet walls. The graphics depict things from different episodes of the series. I think someone created it to add to a real table. I thought the graphics I created for Attack From Mars looked good but this tops it. I had to create a small amount of graphics to fill into the upper corner at the back of the table. In order to add the graphics, you have to add a model because FP doesn't support adding the graphics to the sidewalls. Anyway, I didn't have a model that fit this table so Paolo changed one of the models I had to make it fit perfectly. I got the graphics to fit the model yesterday. It will look better after I add the lighting changes. So here it is:

Right side
```Twilight Zone ULTIMATE 1.022.png

Left side
```Twilight Zone ULTIMATE 1.02.png
 
@Gimli

I think you are getting confused with "Pinup Player" with how I use it with PinEvent tables to display / control pup-packs.... and the pup plug-in. Despite having the name "PuP", the pup plug-in has nothing to do with Pinup Player.

It has two main functions.

- stream image from any window into FP as a texture (what I use for PUPStream on PinEvent tables)
- change / swap FP textures using the texture "ID" (what I use for creating texture animations like what I do for RF2)


Using the pup plug-in for texture swapping means you can create animations on literally "everything" in FP that uses a texture....everything. So, yes you can use my PuP-plug-in method on an Overlay as well to swap textures... but that is pointless and more work for overlays.

My PuP Plug-in method does "not" use Image Sequences at all. You only add the table textures to "any" Image Sequence so they can be "seen" by BAM (instead of using them on a surface / object). There is no limit to how many images can be used with this method since its not using an Image Sequence... though I can't think of why you would ever go beyond 1000+ images for a single video.

If the pup plug-in could use Image Sequences with simplified commands... that certainly would help reduce the code needed. I have a lot in RF2. :) It's mostly just copy / paste and easy to use.... but a more standardized command set / function would be nice.


Even on modern PC games... you don't see long length videos used a textures...and the audio is almost always separate. No convenient easy answers for using lots of videos on a table.
 
@Gimli

I think you are getting confused with "Pinup Player" with how I use it with PinEvent tables to display / control pup-packs.... and the pup plug-in. Despite having the name "PuP", the pup plug-in has nothing to do with Pinup Player.
You are right I am confused...that's how my brain works...I keep spinning the wheels until I somehow get traction :trippy:

It has two main functions.

- stream image from any window into FP as a texture (what I use for PUPStream on PinEvent tables)
- change / swap FP textures using the texture "ID" (what I use for creating texture animations like what I do for RF2)
I thought those were the two functions that you have introduced us to.

So somehow these two functions have nothing to do with each other but share a "PUP" BAM code . Still it begs the question what other types of unrelated functions this BAM conduit might allow.

Like playing videos not from a separate FP window...but somehow internally. I know my ignorance is declaring itself.


Using the pup plug-in for texture swapping means you can create animations on literally "everything" in FP that uses a texture....everything. So, yes you can use my PuP-plug-in method on an Overlay as well to swap textures... but that is pointless and more work for overlays.
Only pointless if loading time and quality is the same and only more work if there is no sequencing code

My PuP Plug-in method does "not" use Image Sequences at all. You only add the table textures to "any" Image Sequence so they can be "seen" by BAM (instead of using them on a surface / object). There is no limit to how many images can be used with this method since its not using an Image Sequence... though I can't think of why you would ever go beyond 1000+ images for a single video.
To me making BAM "see it" and then coding it is analogous to FP seeing and using FP Sequencing code. I don't really see a difference.

If the pup plug-in could use Image Sequences with simplified commands... that certainly would help reduce the code needed. I have a lot in RF2. :) It's mostly just copy / paste and easy to use.... but a more standardized command set / function would be nice.
I agree
Even on modern PC games... you don't see long length videos used a textures...and the audio is almost always separate. No convenient easy answers for using lots of videos on a table.
I think what you and Slam are doing is amazing in this regard, I am just asking questions.
 
@TerryRed
probably my pc, does not accompany me in this ..... but I would like to try ... I know, you have explained it many times, but I,as many times, did not again understand what needs to be done ....

I don't know what it takes to use this "pup"-plug-in, but maybe a demo with only one video using this system, could help to understand better

PS: if you need some external program or anything else, please put it in the zip-demo.....always if possible
 
This table has a somewhat unusual plunger lane. It only runs about half the length of the table so it needs a more delicate touch. I spent part of the morning playing with it. The plunger has been exhibiting some herky jerky movement. I was planning on implementing my usual plunger mod but found it had already been added. The settings for it were off. The way the mod works is a timer slows down the movement of the plunger during pull back so you have a little more time to decide when to release it. The script allows the plunger to move a certain percentage and then it stops for a few milliseconds and then it moves again when the timer runs out. The maximum I have ever seen the timer set was 80 milliseconds. The timer had been set to 150 milliseconds which was causing the jerky movement. Reducing the time improved the jerky movement. I also reduced the percentage which is usually set to 5 percent. I ended up reducing the percentage to 1.1 instead of the usual 5 percent. I lowered the time to 30 milliseconds. The plunger now has many more increments with less time between the increments which fixed the jerky movement of the plunger. Anyway, you can now use some skill to get the skill shot. Basically, hitting the skill shot in the past was mostly a lucky chance.

Then I added the standard dynamic flipper code to the two upper flippers. I still need to add Shiva's flippers to to the upper flippers on the test table. Then comes the challenge of combining them together for a switchable version.
 
Last edited:
Today, I added Shiva's flippers to to the two upper flippers on the test table I have been using. It took me a couple of hours to add the code the two flippers. It was just a matter of copying the code from one of the other flippers and then replacing the name of the flipper. It is difficult to say how long it took Shiva to create the flippers in the first place but no doubt it took a long time. The notes in the comments in the script talk about a flick of the flippers. I believe he is talking about a flick pass as shown in this video:

 
Last edited:
I combined the flipper code for both Shiva's flippers and the standard dynamic flippers (which is what I am calling Gimli's and my version) onto my working copy of the table. I have also set the selections up so they can be changed by pressing "F" repeatedly on the keyboard when the game is loaded and the selection is saved to the fpRAM file. This will help me test the versions. Shiva has 6 versions of his flippers and this option switches between them all; as well as, selecting the standard dynamic flippers.

I managed to get the options to display on the DMD. It is sometimes a struggle to get my stuff to display on the DMD because there are animations constantly being loaded but this table doesn't have so many. I will be adding this option to the menu system later.

I have started adding the bounce control settings to the menu also. In the past, you had to make changes to bounce control in the script. I will be providing 12 switchable options on this table.
 
I made a few changes to display of the 7 flipper options on the DMD. ...So the whole in game change of flippers works well.

I have encountered an odd problem on adding the bounce control to display options on the DMD. The subroutine that contains the options for the bounce also contains the display for the DMD. ...So when the ball hits the flipper, the DMD displays the option you are using even though you did not change it. I am not sure of a way to fix it. I suppose I could add the option to the menu only but I think it would work a bit oddly, or at least not as I planned. You wouldn't be able to change the bounce while a game is in progress as I had hoped. I may have to change it back so you change the bonce control option in the script and leave it at that.
 
Well, I have already figured out a solution to my problem for the DMD display of the bounce control options. I normally place the code for the DMD in the same subroutine where the data is changed. That didn't work here because the DMD would display something on the DMD every time the flipper is hit. ...So I moved the display of the DMD to the part of the routine that processes the key presses. For this option, you have to press the "K" key repeatedly to cycle through the options. I added the DMD display stuff there so it only produces a display on the DMD when the "K" key is pressed. I have never done it that way before but it works.
 
Well, I have finally relegated all the test versions of this table to my "Old Stuff" folder. These versions had all the nonessential stuff moved off the table so I could see all the mechanical parts operate. I now have resolved all the flipper problems where I created many test versions to try different things. I got the Shiva flippers working and then created the in-game switchable version with the standard dynamic flippers. Both versions play well. I am not sure which is my favorite though I do tend to play Shiva's medium flippers the most currently. Everything is in my single working copy now. I originally posted here that Shiva's code ended up being 1000 lines long. That was only for 2 flippers. I now have added the code to all 4 flippers so Shiva's code is not 2000 lines long compared to the 400 lines fot the standard dynamic flippers.

I got tired of having to press a key every time I load the game to change to 5 balls per game. The old table would always reset the balls per game to 3 whenever the game loads. For a long time now, I have been saving your settings to the fpRAM file for all the options I add. Having this table work this way is even more critical because it looks like this table will have more menu options than any table I have published so far. I set it up to display the # balls per game on the DMD and on the instruction card on the right side of the apron. By the way, I did get the new balls per game code working today.
 
Last edited:
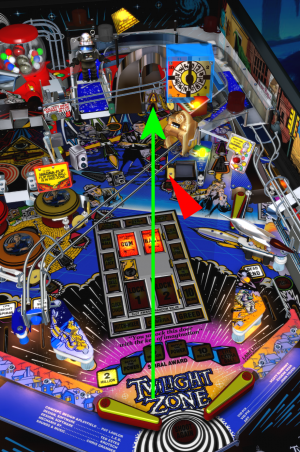
Today I made some progress. I have been struggling with making a shot from the left flipper to the "Lock" which is a spot that you need to hit to start multiball (the shot is identified with the green arrow in the screenshot below). The problem was that the ball would often hit the target identified by the arrow in the screenshot below. Anyway I managed to move all the objects above the red arrow a bit to the right. So now you are not as likely to hit the target when going for the longer shot. ;...But the main thing I am pleased with it that I finally got the lane to work correctly that the green arrow points to. This lane turns around in a half circle. The problem was the ball would hit the wall of the curve and bounce back out of the lane. I managed to come up with a shape of the wall to encourage the ball to go completely around the half circle. Of course, you may still hit the target at the red arrow if you don't aim right.

```Twilight Zone ULTIMATE 1.023.png

I added the code for the HUD toggle key. This table has two textures for the overlay around the HUD DMD. I made the two textures switchable when you press the HUD Toggle Key and the third press of the key makes the HUD fade out. It works nicely and of course your setting is saved to the fpRAM.

I added two more settings for the bounce control. If you remember the settings I have posted in the script of of previous tables. there are 12 settings with some directions that say you can choose the midpoint of the values posted to fine tune the setting. I have chosen to add midpoints between Groups 4 and 5 and also the midpoint of Groups 5 and 6. So now there 14 settings now. I consider the sweet spot for this table to be between Groups 4 and 6. I added these two new settings to allow you to fine tune the setting the way you want.
 
Today I made some progress. I have been struggling with making a shot from the left flipper to the "Lock" which is a spot that you need to hit to start multiball (the shot is identified with the green arrow in the screenshot below). The problem was that the ball would often hit the target identified by the arrow in the screenshot below. Anyway I managed to move all the objects above the red arrow a bit to the right. So now you are not as likely to hit the target when going for the longer shot. ;...But the main thing I am pleased with it that I finally got the lane to work correctly that the green arrow points to. This lane turns around in a half circle. The problem was the ball would hit the wall of the curve and bounce back out of the lane. I managed to come up with a shape of the wall to encourage the ball to go completely around the half circle. Of course, you may still hit the target at the red arrow if you don't aim right.

View attachment 17250

I added the code for the HUD toggle key. This table has two textures for the overlay around the HUD DMD. I made the two textures switchable when you press the HUD Toggle Key and the third press of the key makes the HUD fade out. It works nicely and of course your setting is saved to the fpRAM.

I added two more settings for the bounce control. If you remember the settings I have posted in the script of of previous tables. there are 12 settings with some directions that say you can choose the midpoint of the values posted to fine tune the setting. I have chosen to add midpoints between Groups 4 and 5 and also the midpoint of Groups 5 and 6. So now there 14 settings now. I consider the sweet spot for this table to be between Groups 4 and 6. I added these two new settings to allow you to fine tune the setting the way you want.
I haven't played this major classic for some years now, but I have many fond memories of the real-life version.

It's possible I might have some relevant input to add, let's see...
 
I haven't played this major classic for some years now, but I have many fond memories of the real-life version.

It's possible I might have some relevant input to add, let's see...

I would offer to send it to you but it is fairly memory intensive so I am not sure you would be able to play it.
 
I finished modifying the attract mode today. It was a little more complex than I thought it would be, I edited the audio for Rod Serling's video. The audio has Rod Serling's narrative and then proceeds to Burgess Meredith's narrative followed by music. I cut the Burgess Meredith's narrative because it is repeated on the other video. I did my best lip syncing Rod's audio to the video but added a lip sync option at the beginning of the script so anyone can adjust it.

I made the attract mode switchable so you can select

Rod's narrative only,
Burgess's narrative only,
Alternates between the two videos,
Plays music with no video.

I have been playing the table quite a bit, figuring out the rules and and identifying things that might improve playability. I found it very difficult to hit the right orbit so I made some adjustments to the left flipper angle that helps a lot. It is a critical shot if you want to get to power ball. I think I have the upper left flipper angle set pretty well to hit the piano kicker which is another critical shot. I am still working on the upper right flipper angle though it seems to hit the camera kicker reasonably well.

There is a small bug that occurs when you play a second game. The table only requires one coin to start. The first game requires 2 coins.

The previous move I made to the objects under the slot machine is working perfectly. I can hit the ball lock more easily now and there is no problem hitting the kicker for the slot machine.
 
I watched some videos of the real TZ table and noticed one of the kickers on this table was not aimed correctly. When you make the skill shot, the ball rolls down to a kicker under the rocket and fires it. The ball has always hit a stationary target and then bounced down to the right flipper. The ball is actually supposed to travel up a lane under the miniplayfield and exit the lane above the bumpers. It was a little difficult to find a video that shows this because quite a few players don't go for the skill shot because they consider the risk too great for draining the ball after it exits the bumpers.

I think the reason the table was never set up the correct way to begin with is the table uses an emKicker. The 1.0 physics doesn't have enough strength the kick the ball all the way around the curve under the miniplayfield. I was able the increase the strength in the XML so it works. I also had to change the rotation of the kicker a bit. There is another emKicker on the table somewhere so I will have to find it and possibly reduce the strength slider in the editor so it works right.
 
Forum activity
Help Users
You can interact with the ChatGPT Bot in any Chat Room and there is a dedicated room. The command is /ai followed by a space and then your ? or inquiry.
ie: /ai What is a EM Pinball Machine?
  • No one is chatting at the moment.
      Chat Bot Mibs Chat Bot Mibs: keefus is our newest member. Welcome!
      Back
      Top