- Joined
- May 3, 2016
- Messages
- 2,685
- Solutions
- 6
- Reaction score
- 2,137
- Points
- 145
- Favorite Pinball Machine
- Attack From Mars
| Translate to French or Other Language | Click on the link on the left and a new tab will open with this page translated into French. Click on the "To:" pull-down option to select a different language. |
Preface
Big Change - Now you can use the full code from the All-In-One table on FizX Lite that has the latest version of the tweaker! (or continue using the old code). See Step 6.
If you have been interested in adding FizX to a table, you may have opened the All In One Example Table page and noticed there is a video that is almost 4 hours long on how to do it. It is not difficult to add FizX to a table but it is a little time-consuming even though it is faster than it once was. A novice may find the task rather daunting and may dissuade them from using it. It does help to have a little experience working with Future Pinball tables in order to add FizX this way.
There has been a lot of interest in a less involved process so novices can add at least some elements of FizX to a table that does not require any experience with Future Pinball or its script. That is the purpose of "FizX Lite Edition". Even experts would probably be interested in a process that takes less time. The tutorial may look long but I have gotten reports that it takes about 45 minutes to add it. The FizX Lite Edition addresses the worst problems with Future Pinball; poor flipper accuracy and unrealistic behavior of slingshots. It also includes sound recordings by Fleep for the ball hitting rubber, metal, wood, the apron, flippers, and the ball bouncing on the playfield. FizX Lite Edition does not have other features that are included in the All In One Example Table like:
- FizX bumpers, drop targets, rubber posts, and rubber bands
- Sound recordings by Fleep for the ball hitting drop targets and other table objects on the table like bumpers, flippers, slingshots, plungers, etc.
- FizX Tweaker Tool
- DOF (Direct Output Framework)
- PUP (Pinup Player)
- SSF (surround sound feedback)
Requirements
BAM Version 1.5-363 or higher
Future Pinball Program
FizX Lite Edition zip file (file is attached to the bottom of this message)
The zip file contains:
- Fleep Audio Files
- Invisible Texture
- Slingshot Models
- FizX Lite Edition Example Tables
- Text Files Containing the Script
- FizX 1K Physics Ball (zip file that has the same name as the table - don't unzip)
- Remove any previous physics-related code (like Dynamic Flippers by Gimli/GeorgeH or Shiva flippers). Dynamic Flippers can be removed easily by deleting the code that looks like the code posted here. You can expect the table to have Dynamic Flippers or Shiva flippers if you search the script (open script, click on "Edit" then "Find") and find "prehit" in the script.
- Remove any PHYSICS XML code (the green text code). You can expect the table to have XML code if you search the script (open script, click on "Edit" then "Find") and find "XML" in the script.
- Delete any custom flipper models like those used on Zed Physics. See this example. A novice should not try to remove Zed physics from a table. Zed tables have double flippers with one being invisible and you need to remove it before adding FizX. There is usually an emKicker in front of the slingshots that also needs to be removed. There is also script that needs to be removed which drives the extra set of flippers and emKickers. Fortunately, you can often find versions of the same table that do not have Zed physics.
- Confirm your table plays correctly after removing all of the above!
Step-By-Step Directions
Comments on the video:
- The video shows how to add FizX Lite 2.0. The changes are not that much different in Version 3.0. Please follow the specific changes below.
- Note that you can click on the button "Watch on YouTube" on the video to open a clickable chapter list.
- If you want to be able to use right-click with Future Pinball as I use in the video, follow my tutorial here.
- If you want to try the file manager I used in the video, I posted a review of it here along with a group of files that have all the settings I use.
- Also note that during the last one minute of the video, the ball hit a vertical up kicker (VUK) during gameplay and the sound of it drowns out my voice. All I said was the flipper did not produce an error when hit by the ball so the test was good. I also said the VUK was out of adjustment and I would cover the adjustment of it in another video.
- The video describes the method of copying the script from the example table to the target table. An easier method is described in the directions below although the script can be added to the target table in the way shown if desired.
Note: This guide is written for novices although it includes discussion on tables with more than two flippers and ramps. Novices should start with tables that have no more than two main flippers and no ramps. A novice might work up to tables with more than two flippers and may or may not decide to progress to tables with ramps. On the other hand, it is easy for anyone to add FizX Lite Edition to tables with just two main flippers and no ramp.
This section should be performed in the order of the numbered steps listed below:
1) Download and extract the FizX Lite Edition zip file attached to the bottom of this posting. Do not extract the zip file that has the same name as the table. It contains the 1K physics ball and needs to remain zipped for it to function correctly. Copy the zip file to the same folder as your target table and rename it the same as the table. If you ever change the file name of the table, be sure to rename the zip file also. The physics won't be correct if you don't use the 1K ball.You can rename the zip file as default.zip and save it to your BAM folder so it will automatically load for all tables. However, I have not tried it on tables that do not have FizX installed, and not sure how it would affect the physics. Anyway, if you plan to publish the table, you would still need to include it in the download of the target table.
2) Be sure to remove prior versions of specialized flippers or physics that have been added by the table developer as directed in the Requirements section above. As a minimum, open the script, click on "Edit" then "Find" and search for "prehit" in the script. Then do another search for "XML". If you find either, you will need to remove the code as discussed in the "Requirements" section above before you proceed. Also, be sure you do not have a Zed Physics table that is identified as such on the web page where you downloaded the table. If you don't do this, you will have trouble performing Step 11.
3) Import the FizX models for slingshots from the download into Future Pinball's "Model Manager".
Open the target table in the Future Pinball editor and click on the "Table" pull-down menu and select "Model Manager". Click on the "Import" button and locate the "Slingshot Models" folder in the download. Select and add the entire contents of the folder to the target table.
4) Import all the Fleep Audio Files from the download into Future Pinball's "Sound Manager". You can only import 30 files at a time because of a limitation on Future Pinball. The download includes 3 folders of less than 30 files that need to be imported separately.
Click on the "Table" pull-down menu and select "Sound Manager". Click on the "Import" button and locate the "Fleep Audio Files" folder in the download. Select and add the entire contents of the folder named "1" to the target table. Select and add the entire contents of the folder named "2" to the target table and then add the entire contents of the folder named "3".
5) Import the file from the download folder named "Invisible Texture" into Future Pinball's "Texture Manager". It will be used on the FizX models for slingshots to make them invisible.
Click on the "Table" pull-down menu and select "Texture Manager". Click on the "Import" button and locate the "Invisible Texture" folder in the download. Select and add the file named "FullTransparent.tga" to the target table.
6) The attachment has been changed to include the FizX Lite original code or use code from the full version of the All-In-One (AIO) that now has the latest version of the FizX tweaker (10/18/23). An advantage of using the AIO version is that you can upgrade to the full version of FizX without having to replace the code. This version of the AIO code is identical to the full version of the code except that it has the latest version of the FizX tweaker. The new FizX tweaker can save changes to parameters while playing the game. There is no need to save values to the script. Another advantage is the tweaker only uses one save location (nvS13). The AIO original code also has ball rolling sounds for the playfield and ramps.
I wrote the directions below for the version with the Full AIO Code with New Tweaker that are included in the script but are repeated here for your information so it will help you decide if you want to install it. Don't perform any of these steps yet until you get to Step 7c. There are several options as you can see. The more options you add the more complex it becomes. The process is pretty easy if you only perform the first two bolded steps which will make FizX and the tweaker functional on your table. The rest of the guide is optional. If you decide to add the descriptive overlays, then you need to skip the second bolded step and perform the third boded step. A novice could probably add the ball rolling sound to the playfield (bolded step 4) but may not be able to add the sound to ramps (bolded step 5) depending on how complicated the ramps are on the table. If the table has one or two ramps with no miniplayfields, then a novice could probably do it. If you find all this daunting, you may want to install the FizX Lite Original code. This is the first set of directions ever written for adding ball rolling sound so you may find it useful even if you don't use FizX Lite:
1) If you want to add FizX to your table then:
- Add each of the 10 text files in numerical order starting with "FizX 3.0 AOI and New Tweaker 1". Follow the directions of where to add the script at the beginning of each file.
- If you have played the target table before, either rename the table before you play it with these changes or open the "Table" menu and click on "Table Info". Then click on the button, "Reset fpRam file to Defaults". Note: If you don't perform this step, you will probably get a "string" error.
- Add the following 4 timers named:
- FizXTweak_Timer
- TextDelayTimer
- Tweak_Timer2
- BallRolling_Update_Timer
- Add the font dmd05x05p if not already added.
- It is optional but it is nice to have a sound play when you open the tweaker. You may want to replace the "bonus counter" sound that plays under "If (KeyCode = GetKeyCode(Special1Key))" with a sound on the table.
- Add a HUD DMD named FizXDmd.
- Save your changes and play the table to test it.
- Save any changes you have made so far.
- Change "Tweaker_Overlays_On = False" in the section in the script from False to True.
- Add textures from the download folder named "Tweaker Overlays" to the texture manager.
- Click on "Table" and then click on "Texture Manager".
- Click on "Import" and navigate to the folder from the download named "Tweaker Overlays".
- Click on the first texture and hold your shift key down. Scroll to the bottom of the list and click on the last texture.
- Release your shift key and click " Open " to upload all the textures.
- Create an image list named Tweaker and add the previously added textures to it in the order listed in the texture manager.
- Click on "Table" and then click on "Image List Manager".
- Click on "Create New" which will add a new image list named "ImageList[number]".
- Click on the new image list and then click on "Rename" and rename the image list "Tweaker".
- Click on your new image list and then click on "Edit".
- In the left pane, click on the first texture you added, "TweakerFizX01Transparent".
- Hold your shift key down, and click on the last texture you added, "TweakerFizX24SaveAllSettings".
- Click on "Include" and all the textures you added will be displayed in the right pane.
- Click on "OK" and then "OK" again.
- Copy the Tweaker1, and Tweaker2 overlays, and FizXDmd to the target table using the copy and paste method between 2 tables.
- Leave your target table open and click on the "File" menu and then click on "Open". Open the table, " FizX 3.0 Example Table - Full AIO & New Tweaker".
- Open the translite. Hold the shift key down and click on the number "2" layer in the right pane. Release the shift key and click on layer "3".
- Click on the overlay named "Tweaker1". Hold your shift key down and click on the HUD DMD named "FizXDmd". While still holding the shift key down, click on the overlay named "Tweaker2". Release the shift key and then click on "Edit" on the menu and then click on "Copy".
- Click on "Window" on the menu and click on the name of your target table to open it.
- Click on "Edit" on the menu and then click on "Paste".
- When you click on "Tweaker1" and "Tweaker2", you should see "Tweaker" listed in the "Image List" on the right pane. If it is not there, then select it using the pull-down menu.
- Save your changes and play the table to test it.
- Press the Special 1 key to open the tweaker.
- Add all the Ball Rolling Sound files from the download folder named " Ball Rolling Sound Fleep Audio - Music Manager" to the Music Manager.
- Add the files to the Sound Manager from the folder named "Ball Rolling Sound Fleep Audio - Sound Manager".
- Change "Sub Ball_Rolling_Sound_Settings" as needed (click on "Edit" and "Find" to search for it):
- Note that setting "FP_BallRoll_Max_Volume" to the maximum volume of 1.0 may not make the sound loud enough. Other sounds on the table may drown out the ball rolling sound. If that is true, try using the audio files in the download that have a higher sound level (in the subfolder named "Higher Sound Level (with small amount of clipping)".
- Search the script for a free channel and enter it into "FP_BallRolling_Channel". There are 8 possible channels so search for "Music 1" through "Music 8". You may find hits for EffectMusic [1-8], PlayMusic [1-8] or StopMusic [1-8]. Only enter the channel number that gets no hits into "FP_BallRolling_Channel".
- Enter the name of the sound you want to use on the playfield into "BallRolling_Sound". The name must match the name of the audio file added to the Music Manager.
- Note the Ball Rolling will output to FP if PUP_SSF_enabled = false.
- Note the Ball Rolling will output to PUP if PUP_SSF_enabled = true (and PUP is installed).
- Add the optical and star triggers to the model manager.
- Open "Model Manager" and click on "Link to Library".
- Find the library file "fpModels.fpl" and open it.
- Click on "TriggerOpto-T1" and, hold your "Ctrl" key down and click on "TriggerStar". then click on OK and OK again to add them to the Model Manager.
- Use the "copy and paste method between 2 tables" described previously.
- If you don't have your target table open, open it. From your target table, click on "File Open" and open the Example table.
- Copy the surfaces "LaunchRampExit_Height" and "RampExit_Height" to your table. They are used on the star triggers to set the height.
- Copy the 4 optotriggers and the 2 star triggers and paste them on your table. Click on each of the 2 star triggers to verify that the trigger has been attached to one of the surfaces listed on (1) above.
- You will need to move the triggers around. Be sure that the opto triggers are positioned so the ball will first hit the trigger that has "Enter" at the end of the name. Also, check the height of the triggers. You can uncheck the "Render Model" option on the star triggers to make it visible. You can make the opto triggers visible by removing the invisible texture. You can change the height of the 2 star triggers by adjusting the 2 height settings on the 2 surfaces you added. You may need to add surfaces to set the height of the opto triggers.
- This will add everything you need to play sound for 2 ramps. The sound is set up to play the ball rolling plastic sound by default.
- You can change the default sound by searching the script of your target table for "Sub TriggerRamp_Hit. Change the line referencing "BallRolling_PlasticRamp" to "BallRolling_WireRamp" or "BallRolling_Wood" depending on if you want a wire or wood ramp sound. Perform the same thing to "Sub TriggerLaunchRamp_Hit" if you want to change the sound for the other ramp.
- There are many configurations of ramps. I found this code can be adapted to accommodate several configurations but it does take some thoughtful editing. I suggest you review the coding changes I made on version 1.02 of the "Road Runner" table that has been published. I added quite a few comments that reference GeorgeH in the script. It has two plastic up ramps that lead to a miniplayfield with 2 places the ball can drop down to the playfield and one down ramp. Then there is another wire ramp attached to a vertical up kicker. It might give you some ideas on how you can set up your table.
Each of the two folders with the FizX code have text files saved that have the script you need to add. They should be added in sequential order. Double-click on the first file to open it in the Windows application named "Notepad". Read the comments at the beginning of the text file to determine where to add the contents of the file to the script. Add the contents of the file to the script using this method:
With the file open in "Notepad", click on "Edit" and then click on "Select All". Then click on "Edit" again and click on "Copy". Open the target table in Future Pinball. Click on "Edit" in the editor and then click on "Script" (or click on the script button in the left pane of the editor). Place your cursor in the location where you want to add the script. Then click on "Edit" in the script heading and select "Paste".
Repeat the same process with the remaining text files. Each slingshot has two files associated with it. One file has directions for placing some of the code at the beginning of a slingshot subroutine. The other file has code that is inserted just before the end of each subroutine but see the script for the exact placement.
Both versions have sections of code that must be added to the subroutine for each slingshot on the target table.
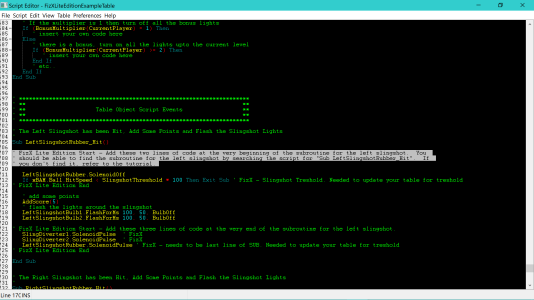
Slingshots are usually named "LeftSlingshotRubber" and "RightSlingshotRubber" because just about all table developers use the same template to build a table. You should be able to find the subroutines for the slingshots in the target table by searching the script for "Sub LeftSlingshotRubber_Hit" and "Sub RightSlingshotRubber_Hit". If you find them, add the new script to the target table following the direction in the Example Table and proceed to Step 7c, otherwise continue on to Step 7b.
7b) If you are continuing, it means you cannot find the name of the slingshot in the script. The name of the slingshot can be determined by clicking on the rubber for the left slingshot in the Future Pinball editor and finding the name in the right pane as shown in the screenshot below. Highlight the name of the slingshot with your cursor. Then, hold down the "Ctrl" key and type the letter "C".

Open the script. Click on "Edit" in the heading and then click on "Replace". Click in the "Find What" box and hold down the "Ctrl" key and type the letter "V" to paste the name of the slingshot that you copied earlier. Click in the "Replace With" box and enter LeftSlingshotRubber (or RightSlingshotRubber for the right slingshot). Click on the "Find" button and then click on "Replace" for each occurrence that is found until no more occurrences are found. Add the content of files "FizX 3.0 Lite Edition" 2 and 3 for the left slingshot (files 4 and 5 for the right slingshot). Exit the script which will return you to the FP editor. Change the name of the left slingshot in the FP editor to LeftSlingshotRubber (or RightSlingshotRubber for the right slingshot).
Repeat the same process in the previous paragraph for the right slingshot, starting at the beginning of Step 7b.
7c) If using the Full AIO Code with New Tweaker, search the script for "FizX 3.0 AOI and New Tweaker Start 3" and follow the guidance listed there to complete the installation. (It is the same guidance posted on Step 6 but should be more convenient to use in the script.)
It is easy to identify the code you added. Each section of of the original FizX Lite code in the text files begins with:
' FizX Lite Edition Start
Each section ends with:
' FizX Lite Edition End
Each section in the text files of the Full AIO Code with New Tweaker begins with:
' FizX 3.0 AOI and New Tweaker Start
Each section ends with:
' FizX 3.0 AOI and New Tweaker End
You can use the find function in the script to search for the green text above.
8) Before you continue, you need to close the target table and save your changes. Then you need to reopen it. The reason for this is Future Pinball can act oddly if you don't periodically save your changes. If you don't do this at this point, you will probably regret it.
9) Open the Example Table and the target table in a side-by-side configuration. Click on the layer numbers in the left pane until you can see all the flippers on both tables. Click on the left main flipper of both tables. Make sure the values in the following fields in the right pane of the Example Table match the ones in the target table:
- Start Angle
- Swing
- Strength (make sure the slider is in the same position in the target table as the Example Table)
- Elasticity (make sure the pull-down option in the target table is the same as the Example Table)
The flippers on the target table must be named LeftFlipper, LeftFlipper2, LeftFlipper3, RightFLipper, RightFLipper2, and RightFLipper3 in order to be compatible with the FizX code. Usually, the two main flippers are already named "LeftFlipper" and "RightFLipper" because table developers typically use the same template. The template did not include more than the two main flippers so any other flipper will probably be named something completely different. Click on each flipper in the Future Pinball editor to be sure the name of the flipper in the right pane complies. If all the names comply, proceed to Step 10. You will need to change the name of any flipper that does not comply. After you change the name of the flipper on the table, open the script and click on "Edit" and then "Replace" so the "Replace" option appears. Enter the old name in "Find what" and the new name in "Replace with". Then click on "Find next" and click on "Replace" for anything that meets the criteria.
10) Add the FizX slingshot diverters to each slingshot. The easiest way to add them is to open the target table in the Future Pinball editor. Then click on "File" and then "Open" and select the Example Table to open it. This will open both tables into the same Future Pinball editor. You can switch between the two tables by clicking on "Window". Select the Example Table and hold down the shift key and click on the number 4 in the left pane of the editor. Future Pinball has all the objects on a table saved to different layers. The slingshot diverters are the only objects on Layer 4. Click on "Edit", then "Select All" and then "Copy". Switch over to the target table and click on "Edit" and then "Paste". This will paste all four diverters onto the target table. Note that the "FullTransparent" texture that you added previously should show up automatically on the pasted diverters. If it is not there, you need to add it while all 4 diverters are still selected.
The slingshot diverters will probably not be in the correct location. Click on Layer 1 so that both Layers 1 and 4 are open on the Example Table. On the target table, click on the layers that make it so the rubber for the slingshots and diverters can be seen. After you pasted the diverters, all four diverters will be selected. Click somewhere on the table to deselect them. Then click on one slingshot diverter, hold your shift key down, and click on the other diverter of the pair. Click and drag both of them a little bit behind the slingshot rubber similar to how it is done in the example table. The diverters may not be the correct length. They should cover the length of the slingshot like in the Example Table. If not the correct length, the two diverters still need to be selected. Click on the pull-down option beside "Model", and select a different model. Keep doing this until you find a model with the best length. If the edge of the diverter is not parallel with the rubber band on the slingshot, click on each diverter separately and adjust the Start Angle in the right pane so they match. The gray area of the diverter should have some overlap like in the Example Table but also cover the length of the slingshot. When done, do the same thing to the other pair of diverters.
11) Close both tables and be sure to save changes to the target table when prompted. You should play the target table at this point to be sure you don't get any error messages. The table may not play correctly because some objects may be out of adjustment. At this point, just look for error messages that appear on the DMD or other display. You should play the table long enough for the ball to be hit by the flippers because I have noticed that error messages sometimes don't show up until the ball hits the flippers. Table adjustments are covered in the next section below. If you get an error message,
- you didn't do something correctly,
- you didn't remove previously installed flippers or XML as directed in the Requirements section above,
- or there may be a conflict between the FizX code with the existing code on the target table.
Adjustments
Comments on the video:
- The video shows how to make adjustments for FizX Lite 2.0. The changes are not that much different in Version 3.0. Please follow the specific changes below.
- I made a small mistake near the end of the video where I talked about the audio parameters section in the script. I changed a "true" statement in the code to a "false" one. Just pretend I didn't do that.
The roller-ball is a useful tool that may help you perform this section. If you have not set it up, here is a guide. The guide says you need a file named "Dinput8.dll". I have found that you may not need it depending on the version of Windows that you have. I suggest that you start on page 7 and try it to see if it works without the extra file. To turn the roller ball on, start a game on Future Pinball and press the left mouse key. Press the left mouse again to turn the ball roller off. If it does not work, you can download the file "Dinput8.dll" from here.
This section of the tutorial can be performed in any sequence although you need to be sure to follow the first three bullets:
● Change the table slope in the script so it is between 5.0 and 7.0 starting with 6.3 and then make adjustments. This will probably be lower than the slope on most tables but it needs to be set there for FizX. The higher the slope, the faster the game will play. Look through the beginning of the script to find the following setting:
Table_Slope = 6.3 ' Default = 6.3 : this overrides the slope setting in FP Editor and PHYSICS XML
As noted in the comment of the script above, the Table_Slope parameter in the script as shown above overrides the settings for table slope in the XML and in the field of the Future Pinball editor.
● The Flipper Swing Angle in the Future Pinball editor for each of the main flippers should be between 48 and 52. The higher the number, the wider the shots of the ball will be. I think 48 seems to work for most tables but you can set it higher for your shots to be wider.
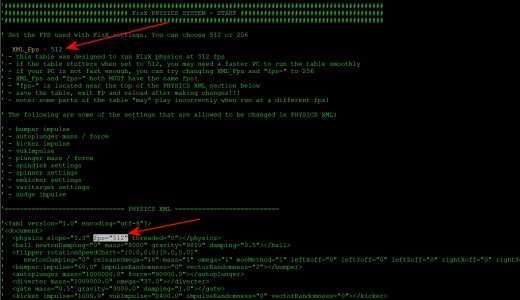
● It is critical for both the "XML_Fps" setting and the fps setting in the "PHYSICS XML" to have the same value. The Example Table has both set at 512 as you can see in the screenshot below. The best performance is 512 frames per second (fps) although you may have to set the fps for both at 256 fps if you have a low-end PC that struggles to run the table smoothly. FizX 3.0 requires fewer resources than Version 2.0 so you should have no problems using 512. It is not desirable to set the fps below 512 unless you have no choice. Note that if you change the "PHYSICS XML" section in the script, the changes will not take effect until you save, close, and restart the table.
● There are many parameters in FizX but you probably won't have to change any values that are already entered except for four of them. The first one is "Flipper Omega":

If the target table has a ramp, the Flipper Omega must be high enough so the ball will go all the way up a ramp. If the ball goes partially up the ramp and rolls back down, you will need to increase the Flipper Omega until the ball traverses correctly. You may need to adjust the Flipper Mass also. On tables without ramps, the value already entered will probably be fine. If you need to make adjustments on the main flippers, enter new values into the Flipper Omega and Mass as needed but leave the strength slider adjustment on the main flipper table object as it was set in the previous section (where it was set at the exact midpoint). If the Flipper Omega and Mass on the main flippers need to be set extremely high, you need to make some changes to the ramp to 1) smooth out rough spots, especially at the transition between metal/plastic ramps and wire ramps 2) decrease the height of the ramp or 3) move the entrance of the ramp forward to decrease the steepness or do other things to improve the performance of the ramp.
In FizX 3.0, the upper flippers have the same parameters as the main flippers so you can adjust them in the same way as the main flippers. Although the Flipper Omega and Mass are saved to the same values as the main flippers, you will probably need to reduce them because upper flippers don't have to hit the ball as far as the main flippers.
The remaining three parameters that you might need to change relate to flipper bounce, High-Velocity Threshold, Flipper Low-Velocity Bouncing Coeff, and Flipper High-Velocity Bouncing Coeff. The amount of flipper bounce is dependent to a great extent on personal preference. You can follow the directions for setting the three parameters that I have added to the script as shown in the screenshot so you can have high or low bounce. The flipper code is identical on the full All-In-One and Lite versions of FizX so the suggested flipper bounce values can be used on any FizX 3.0 table.

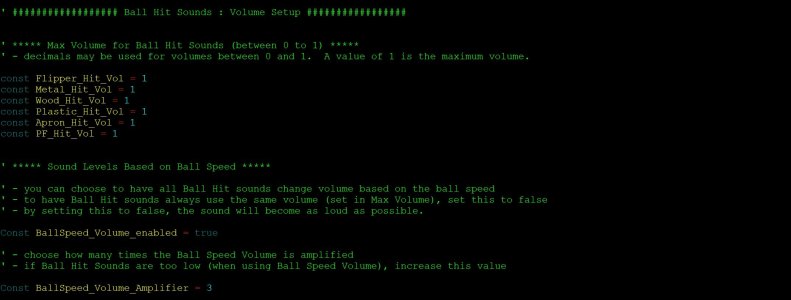
● The screenshot below shows settings in the script for ball hit sounds. Follow the directions in the script to make adjustments. The default settings should be OK. It may be difficult to hear the sounds on some tables because other sounds may drown out the ball hit sounds. If that is the case, try increasing the value for "BallSpeed_Volume_Amplifier". If you still have trouble hearing the sounds, try setting "BallSpeed_Volume_enabled" to false which will play the sounds at the maximum possible volume.
● You may need to adjust the strength of your new slingshots. Adjusting the strength of the rubber band on the slingshot won't work anymore. The way you do it now is to adjust the diverter omega that is in the XML that you saved into the script. Omega is the same thing as strength. See the line from the script below:
' <diverter mass="1000000.0" omega="37.0"></diverter>
For the novices, be sure to save the settings to the XML in the script before you test it. If you don't save changes, the old values will be used and you won't see any difference. It is best to close the FP editor to be sure everything is saved before you test.
● There are several objects on a Future Pinball table that have strength adjustments that you may need to change after you add FizX Lite Edition. The FizX ball is heavier than the ball on most tables so you may need to increase the strength of several table objects (see the list below). It should be obvious they need adjustment. Adjusting the strength of all objects is done in the same way. You click on an object in the Future Pinball editor and a panel appears for it in the right pane. The right pane will have a slider labeled "Strength" that looks like the one used on flippers that you have probably already used. It is not likely to occur, but you may need to move the slider beyond its limits. If this happens, you may need to adjust the PHYSICS XML setting for impulse or force for the object in the script which will change the slider so you can adjust it where needed. You can adjust the nudge impulse as desired in the XML. Note that if you change the "PHYSICS XML" section in the script, the changes will not take effect until you save, close, and restart the table.
As noted above, be sure to save the settings to the XML in the script before you test it. If you don't save changes, the old values will be used and you won't see any difference. It is best to close the FP editor to be sure everything is saved before you test.
Kickers
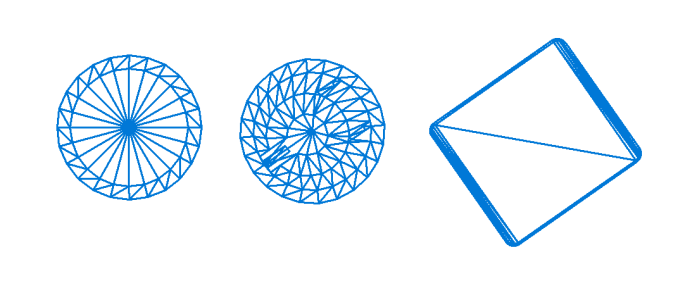
The most likely table object you may need to adjust are kickers, especially vertical up kickers (VUKs). I intentionally selected the table in the video because it has VUKs so I could demonstrate how to adjust them. You can tell the kicker is out of adjustment by it not kicking the ball out very strongly and may not reach the desired target. VUKs that are out of adjustment will usually kick the ball up, fall back down into the kicker, and get kicked again repeatedly. This might appear to be a serious problem but it is easily corrected by increasing the strength of the kicker. Kickers have several models. The screenshot from the Future Pinball editor posted below shows the three most popular models. The center one is often used for vertical up kickers.
To give the strength slider more range, change "kicker impulse" for kickers and "vukImpulse" for vertical up kickers in the XML:
' <kicker impulse="1000.0" vukImpulse="2400.0" impulseRandomness="0" vectorRandomness="0"></kicker>
Plunger
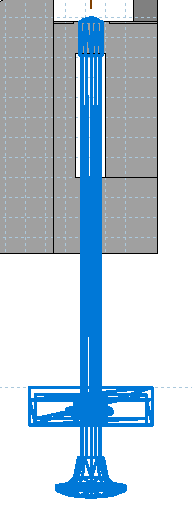
The plunger may not have enough strength to make the ball exit the launch lane with the physics change.
To give the strength slider more range, change the plunger "force" in the XML:
' <plunger mass="1000000.0" force="30000.0"></plunger>
Autoplunger
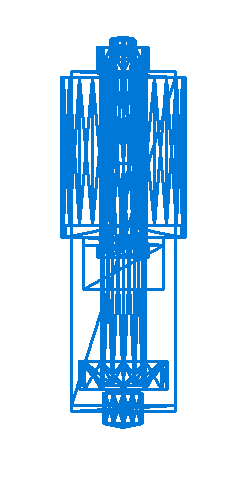
The autoplunger may not have enough strength to make the ball exit the launch lane with the physics change.
To give the strength slider more range, change the autoplunger "force" in the XML:
' <autoplunger mass="1000000.0" force="90000.0"></autoplunger>
Bumpers
Bumpers may not seem as strong as they once were with the physics change. Some bumpers are composed of more than one object such as a base and bumper caps that are on different layers. There will be no strength setting on some of these objects. When you click on the bumper objects, only objects that say "bumper" at the top of the right pane have a slider to adjust the strength and there will only be one for each bumper.
To give the strength slider more range, change the bumper "impulse" in the XML:
' <bumper impulse="60.0" impulseRandomness="0" vectorRandomness="2"></bumper>

Publishing the Table
You may publish tables using FizX Lite Edition as long as you identify it as "FizX Lite Edition" so everyone is able to differentiate it from fully implemented FizX tables. Also when posting a table on Pinball Nirvana, please use the "FizX Lite" prefix as shown on the posting of this tutorial to left the title.
When you post it, please state in the description that it requires BAM Version 1.5-363 or higher.
You need to include the 1K ball in the download of the table.
If you set the fps to 256 for your own personal use, please change it to 512 before posting following the guidance posted in the previous section.
The parameters for the ball in the XML should not be changed.
FizX 2.0 Change Log:
Feb 13, 2023 - Tutorial started.
Feb 20, 2023 - Tutorial completed. Two videos were added. FizX Lite Edition Example Table and files released.
Feb 21, 2023 - Minor edit on Step 6 for clarity.
Apr 18, 2023 - Added step on how to adjust the strength of slingshots.
FizX 3.0 Change Log:
July 3, 2023 - Changed BAM version for FizX 3.0 in the sections for "Requirements" and "Publishing the Table".
July 3, 2023 - Revised step 7 to change to an easier method of adding FizX code by adding the code to a text file instead of copying from the Example Table to the target table.
July 3, 2023 - Revised step 7 to change the way of handling differences in the naming of the slingshots to make it easier.
July 5, 2023 - Updated the "Adjustments" section with new screenshots and edited the text so it works with FizX 3.0.
July 5, 2023 - Added new suggested values for flipper bounce in the comments of the script to match FizX 3.0.
July 13, 2023 - Added sound for ball hits to rubber objects. Added new sounds to the download in folder 3 and updated directions to load them.
July 13, 2023 - JLou changed the default values for Table_Slope, PlayField_Friction, and the HitSpeed in the "Auto_Generated Sound Hit Script".
July 13, 2023 - Added Step 6. Renumbered subsequent steps one higher.
August 28, 2023 - Changed LF_FlipperNudge = 1 to RF_FlipperNudge = 1 for the right flipper solenoid to correct an error.
Attachments
Last edited:

